

-
Posts
119 -
Joined
-
Last visited
-
Days Won
11
Content Type
Profiles
Forums
Downloads
Everything posted by Mr.Bottomfeeder
-

Temp Sensing Detect...
Mr.Bottomfeeder replied to Mr.Bottomfeeder's topic in EScribe, Software and Firmware
Hello @Gwyar, I installed the same theme on all my mods. But since this is a firmware function, the effect should be cross-theme. I also discovered that with the text color, immediately after I wrote the post - and then wrote the addendum below it. 🙂 Best regards -
Hello friends, I am wondering, when and how the DNA (75 as well the 250) checks the "Temp Sensing Detect". Reason for is, if by any reason the DNA won't find the Temp Sensing Wire as such one (fluctuating resistance aso.), it switches the "Temp Sensing Detect"-Flag to "false" (the "Temp Sensing Material"-Flag stays on "true" in that case). Thats OK . But it won't ever switch the "Temp Sensing Detect"-Flag to "true" again, if the problem is fixed (fixed screws in RDA and/or screwing RDA harder into the 510). Every time this happens, I have to connect my Mod to the Escribe-Program, let it download existing settings from Mod and choose "Upload changed Settings to DNA" This is the only one way I found out to set the "Temp Sensing Detected"-Flag to "true" again. By doing this, the Temp Sensing Mode will be activated again. But this is very nagging and can be done only at home. If I am on the way and this problem occurs, I have Wattage mode until I come back home and perform this again. Is there another way to set this flag - or let manually check the "Temp Sensing Detect"-routine in the DNA once again? I tried all, I could imagine - switching wire, measuring resistance again, switching all modes, nothing helps. When TSD is set to "false" one time, it stays on "false" - no mater, what I try. Hope, someone could help with this problem. By the way... Did someone get managed it, in "Theme Designer" - "Appearance" in the Color Scheme "Text"-Color getting the chosen color for Text really displayed on his Theme? I can only choose the "Fill"-Colors and let them displayed in the Theme - but whatever color I choose in "Text", It won't be displayed in my theme, but the color, what I have given for that fields when programming the Theme. (Solved - may not choose a manual color for the fields - after "Reset" the colors, it works fine)😀 Kind regards
-
 Hi Owoman, ah - do we talk about just one untranslated text? After reading your post, I thought, I forgot more text-values for translating.😂 But also this has to be fixed. My themes may not have bugs... Would be nice, if you can gimme a note, if you'll find it again. If you have questions about the Theme Designer, feel free to ask me about. I am a programmer and can help perhaps, if you have some problems with.
 -
Hello, glad to hear, that you like my Theme. Uh in that case, I have to drop an eye again onto this theme, where I have forgotten to translate some text into English language. Seems I have to fix this and upload an updated version then. Until yet, no one has written about this problem. So I had no information about until today. I will overwork this theme - I am really busy in moment, but hoping, in around one week, you can download the newest version what should have correct translated English text everywhere. If you like this theme, feel free to test my other theme. This later developed theme has some more features than the theme, you're using. For example, it has two chooseable main screens - a normal Main Screen with a lot of information and as second a Main Screen "Mad-Eye Moody" with less Information but bigger chars, for users that are wearing glasses 🙂 - Also, it has fewer screens for getting better orientation when using the theme. To me, the “LED-Easy Colors” is more my favorite theme. Kind regards Mr. Bottomfeeder
-
Hallo Dennis, ich habe eben die Nachfolgeversion dieses Themes hochgeladen (siebe unten). Wenn Du magst, kannst Du Dir diese - sobald die Prüfung dieses neuen Themes durch die Foren-Betreiber abgeschlossen ist, hier herunterladen und testen. Ich hoffe, dass der "Menu-Error"-Fehler mit dem neuen Theme nicht mehr auftritt. Beste Grüsse ------------------------ Hello Dennis, I have just uploaded the successor version of this theme (see below). If you like, you can download and test the new Theme as soon as the forum-owners have completed the security checks. I hope that the "Menu Error" error does not occur anymore with the new Theme. Kind regards Mr. Theo Bottomfeeder LED - Easy Colors - V1.0.1 German for DNA 75C DNA 250C.ecigtheme Mr. Theo Bottomfeeder LED - Easy Colors - V1.0.0 English for DNA 75C DNA 250C.ecigtheme
-
Version 1.0.4
337 downloads
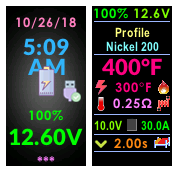
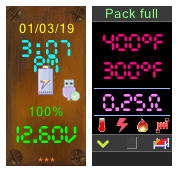
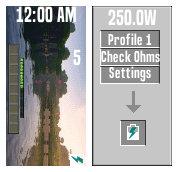
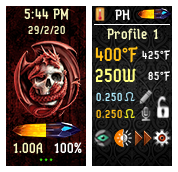
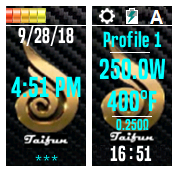
Here is the successor-version of my theme "Mr. Theo Bottomfeeder Black" - Availiable in English and German GUI language. A little more modern, fewer screens and therefore clearer. But all the necessary features of "Mr. Theo Bottomfeeder Black" are included. English Description (Deutsche Beschreibung siehe unten) Theme : "Mr. Theo Bottomfeeder LED - Easy Colors" for DNA 75C/250C Supports: - Replay - Powerbank - up to 4 Batteries - English and German GUI-Languages availiable - This Theme-Version was created by: Author: Hubert Allgäuer (Alias "Mr. Bottomfeeder"), Lake of Constance, Germany with using the program: "EScribe Suite V 2.0 with Service Pack 15.1" Here my second Theme for the DNA75C/DNA250C (tested on Therion BF 75C, Rebel BF 75C and Boxer BF DNA250C) available in english and german language. It is a very comfortable, informative and comprehensive theme in black. Developed for all who wan't to have knowledge about all parameters of the DNA. No playful pictures, only information and all parameters of the DNA chip can be called up and displayed. But these are arranged in a unique, easily understandable and intuitive way. This theme is easy for viewing display in dark and bright background and not just well suited for developers and those who want to have full control over all the settings of the DNA chip but for all usual users as well. (The error in the lock-screen what is shown here in the Overview doessn‘t exist in real theme - see pic below. Hoping everything works well - if you find some problems or malfunctions or having wishes or questions, please feel free to drop me a note here. I would appreciate your comments on the usability of this theme, what you think about this theme, your suggestions for improvement and your wishes for furter updates. Wish to have fun with this theme Greetings Mr. Bottomfeeder ---------------------------------------------------------------------- Information: ---------------------------------------------------------------------- For using the Theme "Mr. Theo Bottomfeeder LED" with the new Replay-Mode, you need the following Firmware on your Device. Otherwise this Theme can not be installed. Needed Firmware on the device: "1.1 SP 33.2 INT" or later version ---------------------------------------------------------------------- Manual ---------------------------------------------------------------------- Mainscreen 1 "Bad Eyes" and Mainscreen 2 "More informations": Upper side left: Percent-Value >>clicking opens the other Mainscreen - if Mainscreen 1 "Bad Eyes" is selected as active Mainwindow, then Mainscreen 2 "More informations" will be displayed. If Mainscreen 2 "More informations" is activated as Mainscreen, Mainscreen 1 "Bad Eyes" will be showed by clicking this field<< --Selecting active Mainscreen (Mainscreen 1 aka "Bad Eyes" or Mainscreen 2 - "More informations") and specifying which screen is defined as Mainscreen by de-/activating the button "Mainscreen" in the screen "Display" (Red = Mainscreen 1 "Bad Eyes", Green = Mainscreen 2 "More informations")-- Upper right side: Voltage-Value >>clicking opens Screen "USB", if connected - otherwise opens screen "Pack"<< or Upper side: Pack-Level as graphic bar display >>clicking opens Screen "USB", if connected - otherwise opens screen "Pack"<< --Selecting what to show: By clicking the button "Pack Main" in the screen "Display"(Red=Numbers, Green=Pack-Level as graphic bar display)-- Voltage-state is displayed in different colors - depending on the battery level (green> = 66%, yellow> = 33% and <66%, red <33%). Charged full and Pack-Empty-Alert when using is displayed in relevant Screens ++Only in Mainscreen 2 "More informations"++: Below Pack-Display: Profile and Mode >>clicking one to select a Profile or Mode<< or Below Pack-Display: Date and Time >>clicking one opens Screen "System"<< or Below Pack-Display: Big Time >>clicking opens Screen "System"<< --Selecting what to show: By de-/activating the two buttons "In Main" in the screen "System" - Left button = switching Profile and Mode (red) or time display (green), right button = if time display is activated switching between date and time (blue) or big time (yellow)-- or If firing, a flame symbol appears at this place ++Only in Mainscreen 2 "More informations"++: Above the lower information line: Left display: Switch "Volt/Watt" - Coil voltage(Red)/coil power(Green) Right display: Switch "Ampere/Ohm" - Coil current(Red)/Coil Resistant(Green) Lower display: Switch "Puff/Puffs" - duration of the current Puff(Red) / total number of Puffs since reset(Green) --The contents for output values for the lower three fields can be choosen in Screen "Display"-- ---------------------------------------------------------------------- Symbols (Mainscreen 1 "Bad Eyes" and Mainscreen 2 "More informations"): ---------------------------------------------------------------------- "Lightning" with three modes 1. Grey lightning is displayed in Watt-Mode, if Boost is deactivated or in other Modes Preheat is not activated >>clicking opens Screen "Profile"<< 2. Yellow lightning is displayed in Watt-Mode, if Boost is activated >>clicking opens Screen "Profile"<< 3. Switch (blue and red lightning) is displayed, if Pre-Heat (only in Not-Watt-Modes availiable) is activated >>clicking the lightning switches display between:<< - Red lightning (switch is Off) and Temp-Control is activated: Upper side Coil-Temperature - Lower side: Pre-Heat-Temperature - Red lightning (switch is Off) and Temp-Control is deactivated: Upper side Coil-Power - Lower side: Pre-Heat-Temperature - Blue lightning (switch is On) and Temp-Control is activated: Upper side Pre-Heat-Power - Lower side: Punch-Level - Blue lightning (switch is On) and Temp-Control is deactivated: Upper side Pre-Heat-Power - Lower side: Punch-Level --Selecting what to show: If Pre-Heat is activated and depending on whether Temp-Control is on or off, you can toggle the output what is specified here-- "Flame" with two modes >>clicking opens Screen "TC/Pre-Heat"<< 1. Grey flame, if no Pre-Heat is activated 2. Colored flame , if Pre-Heat is activated "Thermometer" with two modes >>clicking opens Screen "Settings 1"<< 1. Strikethrough, if no activated Temp-Control or coil with no Temp Sensing Material or coil with Temp Sensing Material but no Temp Sensing detected (wrong coil-wire for choosen Profile or coil with contact problems - fluctuating coil-resistance) 2. Colored if actual Profile is Temp-Controlled "Coil" with six modes >>clicking opens Screen "Info-Power"<< 1. Blue coil with both pins down: If Boost deactivated and no Temp-Sense-Material and no Temp-Sence Detect (usual Watt-mode) 2. Blue coil with right pin up: If Boost activated and no Temp-Sense-Material and no Temp-Sense detect (usual Watt-mode with Boost) 3. White coil with both pins down: If Temp-Control deactivated and Temp-Sense-Material but no Temp-Sense detected (mostly no Temp-Control with Temp Sensing wire - but wrong TC-wire used or contact-problems - - fluctuating coil-resistance) 4. White coil right pin up: If Temp-Control activated and Temp-Sense-Material but no Temp-Sense detected (mostly Temp-Control with Temp Sensing wire - but wrong TC-wire used or contact-problems - - fluctuating coil-resistance) 5. Red coil both pins down: If Temp-Sense-Material and Temp-Sense detect but no Temp-Control activated (TC-wire with not activated Temp-Control) 6. Red coil right pin up: If Temp-Sense-Material and Temp-Sense detected and Temp-Control activated (full working Temp Sensing Mode, TC-wire with activated Temp-Control) Replay: Bottom Center: "Replay"-Buttons (like on a Cassette-Recorder). - Grey: Replay is deactivated - Halt-Symbol (two red vertical bars): Replay is on - Record-Symbol (a filled red circle): Replay has recorded a puff and is ready for playing - Play-Symbol (a filled red triangle): Replay is playing When Replay is Playing, the words "Replay" and "active" are displayed in big yellow chars in both Mainscreens. Additional a graphic bar display for control Replay warmth is shown. Mainscreen 1 "Bad eyes" and Mainscreen 2 "More informations": Icon below right - Lockscreen (Symbol "Bed") or Mainscreen 1 Screen "Bad Eyes" (Symbol "Glasses") / Mainscreen 2 (Symbol "House") Function of the lower right symbol in Mainscreen switches in all screens (except Lockscreen and Mainscreens) either back to Mainscreen 1 "Bad Eyes" or Mainscreen 2 "More informations" depending on the selection of the switch "Mainscreen" in the screen "Display". Due to the limitation of the software, the Mainscreen 1 "Bad Eyes" will always be displayed after unlocking the device, even if Mainscreen 2 "More informations" is activated as Mainscreen. In this case, the Mainscreen 2 "More informations" can be accessed again by simply clicking on the lower right icon. - Specify which screen is defined as Mainscreen by de-/activating the button "Mainscreen" in the screen "Display" (Red = Mainscreen 1 "Bad Eyes", Green = Mainscreen 2 "More informations") - ++Only in Mainscreen 1 "Bad Eyes"++: While firing, a flame symbol appears instead of the lower six Symbols at this place All other elements should be self-explanatory. ---------------------------------------------------------------------- REPLAY ---------------------------------------------------------------------- BE AWARE! Do never enable the "Puff saved, playing" checkbox in the profile settings of your EScribe program. Check this setting if Replay does not work as expected. If activating the checkboxes "Puff saved, playing" at this point, the Replay mode would be activated - but without a recorded favourite puff, what could cause malfunctions. So just activate the checkboxes "Use replay on this profile". Origin DNA-Datasheet: 'Replay is intended to capture the flavor and satisfaction of the “perfect puff” and provide the same level of performance and consistency on all subsequent puffs. The use of Nickel, Stainless, Titanium, or other material that increases in resistance when heated is required. In addition, Replay will also prevent dry hits when used with wattage control. To use Replay set the device to the desired power level and operate it normally. Once a satisfying puff is achieved, activate the feature to save and replay the saved puff each time the device is fired. Puff length is not a factor and the user will not be limited to the length of the previous puff. Disable Replay to resume normal operation or find a new puff to save. If Replay cannot be enabled the coil is not compatible. ' (Source: https://downloads.evolvapor.com/dna75color.pdf) Activating Replay-Mode: The Replay-Mode is changeable seperately for each Profile. It can be activated directly in this theme, if choosing in the "Replay"-Page ("Menu 1" - "Replay"). Also the activation of the Replay-Mode can be done in the Profile-Settings in the EScribe-Program and uploading the changed Profile-Settings onto your device then. If the Replay-Mode is activated, the standard grey Replay-Symbol on both Main-Pages of this theme is changing into a "Halt"-Symbol (two red standing bars - similar the "Halt"-Button on a tape-machine). Recording a puff for Replay: If the Replay-Mode is activated, you have to puff some times for initializing the Replay-Mode. As soon the Replay-Mode is prepared for recording a puff, the "Halt"-Symbol on Mainscreen changes into a red filled circle (like the "Record"-Button on a tape-machine). Now you can click the "Record"-Symbol after you had a puff that fully meets your expectations. Play a recorded puff in Replay (always repeated): As soon, as a puff is recorded, the Replay-Symbol changes into a red Triangle "Play"-Symbol (also like the "Play"-Button on a Tape-Machine). Additionally the words "Replay" "active" are displayed in big yellow chars on both Main-Screens of the Theme. That shows, the previous recorded puff will be repeated endless now. Stop Replay-Mode: For ending the Replay-loop, just click onto the red "Play"-Symbol. The yellow "Replay"-Name dissappears from the Main-Screens and the Replay-Symbol changes back into the red filled Circle "Record"-Symbol. The Device went back into normal using-mode now. By clicking the "Record"-Symbol again, the last puff will be saved and the Replay-Mode changes into the Play-Mode. ---------------------------------------------------------------------- History: ---------------------------------------------------------------------- 1.0.0 First version of this theme 1.0.1 Some Bugfixes/Corrections 1.0.2 Missing translations added 1.0.3 Minor Bugfixes - Improvement: When connected and as long as the battery is charging, now "Pack charging" is displayed in both Mainscreens 1.0.4 Minor Bugfixes - Improvement: In Mainscreens "Pack Full", "Pack empty", "Charging" now more readable, Symbols in Mainscreen now links to most used Screens ---------------------------------------------------------------------- Versions ---------------------------------------------------------------------- Availiable Versions(each in English and German): - Mr. Theo Bottomfeeder LED - Easy Colors - Mainscreens full colorized, text-fields in other screens in yellow and white color ---------------------------------------------------------------------- German Translation ---------------------------------------------------------------------- Hier die Nachfolge-Version meines Themes "Mr. Theo Bottomfeeder Black" - verfügbar in deutscher und englischer GUI-Sprache. Etwas moderner, weniger Screens und dadurch übersichtlicher. Aber dennoch sind alle notwendigen Funktionen von "Mr. Theo Bottomfeeder Black" enthalten. Deutsche Beschreibung (English Description see upper text) Theme: "Mr. Theo Bottomfeeder LED - Easy Colors" für DNA 75C/250C Unterstützt: - Replay - Powerbank - bis zu 4 Akkus - Englische und deutsche GUI-Sprachen verfügbar - Diese Theme-Version wurde erstellt von: Autor: Hubert Allgäuer (Alias "Mr. Bottomfeeder"), Bodensee, Deutschland mit dem Programm: "EScribe Suite V 2.0 mit Service Pack 15.1" Hier mein zweites Theme für die DNA 75C/DNA250C (getestet mit Therion BF 75C, Rebel BF 75C und Boxer BF DNA250C) in englischer und deutscher Sprache. Es ist ein sehr komfortables, informatives und umfassendes Theme in Schwarz. Entwickelt für alle, die über sämtliche Parameter der DNA Bescheid wissen wollen. Keine verspielten Bildchen, nur Informationen und sämtliche Parameter des DNA-Chips abrufbar und angezeigt. Aber diese dafür in einzigartiger Weise leicht verständlich und intuitiv bedienbar arrangiert. Dieses Theme ist in dunkler und heller Umgebung leicht abzulesen und nicht nur gut geeignet für Entwickler und diejenigen, die die volle Kontrolle über alle Einstellungen des DNA-Chips haben wollen, sondern auch für alle normalen Benutzer. (Der Fehler im Lock-Screen, welcher hier in der Übersicht angezeigt wird, existiert es im realen Theme nicht - siehe Bild unten. Ich hoffe, dass alles gut funktioniert - wenn Ihr Probleme oder Fehlfunktionen feststellt oder Wünsche oder Fragen habt, können Ihr mir gerne eine Nachricht hinterlassen. Über Eure Kommentare zur Brauchbarkeit dieses Themes würde mich mich sehr freuen, auch über Eure Meinung zu diesem Theme, über Verbesserungsvorschläge und Eure Wünsche für künftige Updates. Viel Spaß mit diesem Theme Beste Grüße Mr. Bottomfeeder ---------------------------------------------------------------------- Information: ---------------------------------------------------------------------- Zur Verwendung des Themes "Mr. Theo Bottomfeeder LED" und des neuen Replay-Modus benötigt Ihr folgende Firmware auf Eurem Gerät. Ansonsten kann dieses Theme nicht installiert werden. Benötigte Firmware auf dem Gerät: "1.1 SP 33.2 INT" oder höhere Version. ---------------------------------------------------------------------- Bedienung ---------------------------------------------------------------------- Mainscreen 1 "Bad Eyes" und Mainscreen 2 "Mehr Informationen": Oben links: Akku-Level in Prozent >>Klick öffnet das jeweils andere Mainscreen - also Mainscreen 2 "Mehr Informationen", wenn Mainscreen 1 "Bad Eyes" das aktive Mainscreen ist oder wenn Mainscreen 2 "Mehr Informationen" als aktives Mainscreen eingestellt ist, wird Mainscreen 1 "Bad Eyes" angezeigt<< --Auswahl des aktiven Mainscreens (Mainscreen 1 "Bad Eyes" oder Mainscreen 2 "Mehr Informationen") und festlegen, welches der beiden Screens als Mainscreen definiert wird, durch De-/Aktivieren der Schaltfläche "Mainscreen" im Screen "Anzeige" (Rot = Mainscreen 1 "Bad Eyes", Grün = Mainscreen 2 "Mehr Informationen" als Mainscreen festlegen)-- Rechts oben: Akku-Spannung >>Klick öffnet Screen "USB", wenn verbunden - andernfalls wird Screen "Akku" geöffnet<< oder Oben: Graphische Balken-Anzeige für Akku-Level >>Klick öffnet Screen "USB", wenn verbunden - andernfalls wird Screen "Akku" geöffnet<< --Auswählen was angezeigt werden soll: Durch Anklicken der Schaltfläche "Akku Main" im Screen "Display" (Rot=Zahlen, Grün=Graphische Balken-Anzeige für Akku-Level)-- Der Akkuzustand wird in verschiedenen Farben angezeigt - abhängig vom Akku-Level (Grün >= 66%, Gelb >= 33% und <66%, Rot < 33%) Der Akku-Voll- und Akku-Leer-Alarm wird bei der Verwendung in den entsprechenden Screens angezeigt ++ Nur in Mainscreen 2 "Mehr Informationen"++: Unterhalb der Akku-Anzeige: Profil und Modus >>eines Anklicken zur Auswahl eines Profils oder Modus<< oder Unterhalb der Akku-Anzeige: Datum und Uhrzeit >>eines Anklicken öffnet Screen "System"<< oder Unterhalb der Akku-Anzeige: Grosse Uhrzeit >>Anklicken öffnet Screen "System"<< --Auswählen was angezeigt werden soll: durch De-/Aktivieren der zwei Schaltflächen "In Main" im Screen "System" - Linker Button = Umschalten Profil und Modus (rot) oder Zeitanzeige (grün), rechter Button = Bei aktivierter Zeitanzeige Umschalten Datum und Zeit (blau) oder grosse Uhrzeit (gelb)-- oder Wenn gefeuert wird erscheint stattdessen ein Flammensymbol ++ Nur in Mainscreen 2 "Mehr Informationen"++: Über der unteren Informations-Zeile: Linke Anzeige: Schalter "Volt/Watt" - Coil-Spannung(Rot)/Coil-Leistung(Grün) Rechte Anzeige: Schalter "Ampere/Ohm" - Coil-Strom(Rot)/Coil-Widerstend(Grün) Untere Anzeige: Schalter "Zug/Züge" - Dauer des aktuellen Zugs(Rot)/Gesamtanzahl der Züge seit Reset(Grün) --Die Inhalte für die Ausgabewerte für die unteren drei Felder können im Screen "Anzeige" ausgewählt werden-- ---------------------------------------------------------------------- Symbole (Mainscreen 1 "Bad Eyes" und Mainscreen 2 "Mehr Informationen"): ---------------------------------------------------------------------- "Blitz" mit drei Modi 1. Grauer Blitz wird angezeigt, wenn wenn im Watt-Modus Boost deaktiviert oder in anderen Modi Vorheizen nicht aktiviert ist >>Anklicken öffnet Screen "Profil"<< 2. Gelber Blitz wird angezeigt, wenn wenn im Watt-Modus Boost aktiviert wurde >>Anklicken öffnet Screen "Profil"<< 3. Schalter (blauer oder roter Blitz) wird angezeigt, wenn Vorheizen (nur in Nicht-Watt-Modi verfügbar) aktiv ist >>Umschalten zwischen folgenden Anzeigen durch Anklicken des Blitz-Symbols<< - Roter Blitz: (Schalter ist ausgeschaltet) und Temp-Control aktiviert: Oben Coil-Temperatur - Unten: Vorheizen-Temperatur - Roter Blitz: (Schalter ist ausgeschaltet) und Temp-Control deaktiviert: Oben Coil-Leistung - Unten: Vorheizen-Temperatur - Blauer Blitz: (Schalter ist eingeschaltet) und Temp-Control aktiviert: Oben Vorheizen-Power - Unten: Punch-Level - Blauer Blitz: (Schalter ist eingeschaltet) und Temp-Control deaktiviert: Oben Vorheizen-Leistung - Unten: Punch-Level --Auswählen, was angezeigt werden soll: Wenn Vorheizen aktiviert ist, kann abhängig davon, ob Temp-Control ein- oder ausgeschaltet ist, die hier angegebene Anzeige umgeschaltet werden-- "Flamme" mit zwei Modi >>Anklicken öffnet Screen "TC/Vorheizen"<< 1. Graue Flamme, wenn kein Vorheizen aktiviert ist 2. Farbige Flamme, wenn Vorheizen aktiviert ist "Thermometer" mit zwei Modi >>Anklicken öffnet Screen "Einstellungen 1"<< 1. Durchgestrichen, wenn keine Temp-Control oder Coil ohne Temp Sensing Material oder Coil mit Temp Sensing Material aktiviert wurde, aber keine Temp Sensing erkannt wurde (falscher Coildraht für gewähltes Profil oder Verdampfer mit Kontakt-Problem - schwankender Coil-Widerstand) 2. Farbig, wenn Temp-Control aktiviert ist "Wicklung" mit sechs Modi >>Anklicken öffnet Screen "Info-Power"<< 1. Blaue Wicklung mit beiden Pins nach unten: Wenn Boost deaktiviert ist und kein Temp-Sense-Material und kein Temp-Sence-Detect (üblicher Watt-Modus) 2. Blaue Wicklung mit rechtem Pin nach oben: Wenn Boost aktiviert ist und kein Temp-Sense-Material und kein Temp-Sense-Detect (üblicher Watt-Modus mit Boost) 3. Weiße Wicklung mit beiden Pins nach unten: Wenn Temp-Control deaktiviert aber Temp-Sense-Material, aber kein Temp-Sense erkannt wurde (meistens kein Temp-Control mit Temp-Sensing-Draht - aber falscher TC-Draht verwendet oder Verdampfer mit Kontaktproblem - schwankender Coil-Widerstand) 4. Weiße Wicklung mit rechtem Pin nach oben: Wenn Temp-Control aktiviert und Temp-Sense-Material, aber kein Temp-Sense erkannt wurde (meistens Temp-Control mit Temp-Sensing-Draht - aber falscher TC-Draht verwendet oder Verdampfer mit Kontaktproblem - schwankender Coil-Widerstand) 5. Rote Wicklung mit beiden Pins nach unten: Wenn Temp-Sense-Material und Temp-Sense erkannt werden, aber keine Temp-Control aktiviert ist (TC-Draht aber nicht aktivierter Temp-Control) 6. Rote Wicklung mit rechtem Pin nach oben: Wenn Temp-Sense-Material und Temp-Sense erkannt werden und Temp-Control aktiviert ist (voll funktionierender Temp-Sensing-Modus, TC-Draht mit aktivierter Temp-Control) Replay: Unten Mitte: "Replay" -Buttons (wie bei einem Kassetten-Recorder). - Grau: Replay ist deaktiviert - Stop-Symbol (zwei rote vertikale Balken): Replay ist aktiviert - Record-Symbol (ein gefüllter roter Kreis): Replay hat einen Zug aufgezeichnet und ist bereit zum Abspielen - Play-Symbol (ein gefülltes rotes Dreieck): Replay wird abgespielt Während der Wiedergabe werden die Wörter "Replay" und "aktiviert" in großen gelben Zeichen auf beiden Mainscreens angezeigt. Zusätzlich wird eine Balken-Anzeige für die Einstellung der Replay-Wärme eingeblendet. Mainscreen 1 "Bad Eyes" und Mainscreen 2 "Mehr Informationen": Symbol unten rechts - Lockscreen (Symbol "Bett") oder Mainscreen 1 Screen "Bad Eyes" (Symbol "Brille") / Mainscreen 2 "Mehr Informationen" (Symbol "Haus"), je nachdem, welches Mainscreen als aktives Mainscreen eingestellt ist Funktion des unteres rechtes Symbols in Mainscreen schaltet - abhängig von der Auswahl des Schalters "Mainscreen" im Screen "Anzeige" - in allen Screens (ausser Lockscreen und Mainscreens) entweder zurück auf Mainscreen 1 "Bad Eyes" oder Mainscreen 2 "Mehr Informationen". Bedingt durch die Limitation der Software wird nach dem Unlock des Gerätes immer das Mainscreen 1 angezeigt, auch wenn Mainscreen 2 ("Bad Eyes") als Mainscreen aktiviert ist. In diesem Fall kann das Mainscreen 2 "Mehr Informationen" durch einfaches Anklicken des unteren rechten Symbols wieder aufgerufen werden. -- Festlegen, welche Screen als Mainscreen definiert wird, durch De-/Aktivieren der Schaltfläche "Mainscreen" im Screen "Anzeige" (Rot = Mainscreen 1 "Bad Eyes", Grün = Mainscreen 2"Mehr Informationen")-- ++ nur in Mainscreen 1 ("Bad Eyes")++: Während gefeuert wird erscheint statt der sechs unteren Symbolen ein Flammensymbol Alle anderen Elemente sollten selbsterklärend sein. ---------------------------------------------------------------------- REPLAY ---------------------------------------------------------------------- VORSICHT! Aktivieren Sie in den Profil-Einstellungen Ihres EScribe-Programms nie die Checkbox "Puff saved, playing". Kontrollieren Sie diese Einstellung, wenn Replay nicht wie erwartet funktioniert. Wenn Sie an dieser Stelle die Checkboxen "Puff saved, playing" aktivieren, wird der Replay-Modus aktiviert - allerdings ohne einen aufgezeichneten Lieblings-Puff, was zu Fehlfunktionen führen kann. Aktivieren Sie also einfach nur die Kontrollkästchen "Use replay on this profile". Origin DNA-Datenblatt(Übersetzung): "Replay soll den Geschmack und die Zufriedenheit des 'perfekten Puffs' erfassen und bei allen folgenden Zügen die gleiche Leistung und Konsistenz bieten. Die Verwendung von Nickel, Edelstahl, Titan oder einem anderen Material, das den Widerstand beim Erhitzen erhöht, ist erforderlich. Darüber hinaus verhindert Replay bei Verwendung der Wattzahlkontrolle auch das Auftreten von Trockenschlägen (Dry-Hits). Um Replay zu verwenden, stellen Sie das Gerät auf die gewünschte Leistungsstufe ein und betreiben Sie es normal. Sobald ein zufriedenstellender Zug erreicht ist, aktivieren Sie die Funktion zum Speichern und Wiedergeben des gespeicherten Zuges jedes Mal, wenn die Feuertaste betätigt wird. Die Länge des Puffs ist kein Faktor und der Benutzer ist nicht auf die Länge des vorhergehenden Puffs beschränkt. Deaktivieren Sie Replay, um den normalen Betrieb fortzusetzen oder einen neuen Puff zum Speichern zu finden. Wenn Replay nicht aktiviert werden kann, ist die Coil nicht kompatibel." (Quelle: https://downloads.evvolpapor.com/dna75color.pdf) Replay-Modus aktivieren: Der Replay-Modus ist für jedes Profil einzeln änderbar. Es kann direkt in diesem Theme aktiviert werden, wenn diese Funktion in der "Replay"-Screen ("Menu 1" - "Replay") aktiviert wird. Auch kann die Aktivierung des Replay-Modus in den Profil-Einstellungen im EScribe-Programm erfolgen und dann die geänderten Profil-Einstellungen auf das Gerät hochgeladen werden. Wenn der Replay-Modus aktiviert ist, wechselt das graue Standard-Replay-Symbol auf beiden Main-Pages dieses Themes in ein "Stop" -Symbol (zwei rote stehende Balken - ähnlich dem "Pause" -Button auf einem Cassetten-Recorder) . Aufnahme eines Zugs für Replay: Wenn der Replay-Modus aktiviert ist, müssen Sie einige Male dampfen, um den Replay-Modus zu initialisieren. Sobald der Replay-Modus für die Aufnahme eines Zugs vorbereitet ist, wechselt das "Pause"-Symbol auf dem Mainscreen in einen roten gefüllten Kreis (wie der "Aufnahme" -Button auf einem Cassetten-Recorder). Jetzt können Sie das "Aufnahme" -Symbol Anklicken, nachdem Sie einen Zug hatten, der Ihre Erwartungen voll erfüllt. Wiederholen eines aufgezeichneten Zugs in Replay (wird immer wiederholt): Sobald ein Zug aufgezeichnet wird, verwandelt sich das Replay-Symbol in ein rotes Dreieck "Play" -Symbol (auch wie der "Play" -Button auf einem Cassetten-Recorder). Zusätzlich werden die Worte "Replay" und "aktiviert" in großen gelben Zeichen auf beiden Mainscreens des Themes angezeigt. Das zeigt an, dass der vorher aufgezeichnete Zug nun endlos wiederholt wird. Beenden/Unterbrechen des Replay-Modus: Um den Replay-Loop zu beenden, klicken Sie einfach erneut auf das rote "Play" -Symbol. Der gelbe "Replay"-Name verschwindet von den Mainscreens und das Replay-Symbol wechselt zurück in den rot gefüllten Kreis "Aufnahme"-Symbol. Das Gerät ist jetzt wieder in den normalen Benutzungsmodus zurückgekehrt. Durch erneutes Anklicken des "Aufnahme"-Symbols wird der letzte Zug gespeichert und der Replay-Modus wechselt in den Play-Modus. ---------------------------------------------------------------------- Historie: ---------------------------------------------------------------------- 1.0.0 Erste Version dieses Themes 1.0.1 Einige Fehler beseitigt/Korrekturen 1.0.2 Fehlende Übersetzungen ergänzt 1.0.3 Kleinere Bugfixes - Verbesserung: Wenn Verbunden und solange der Akku lädt, wir nun "Akku lädt" in beiden Mainscreens angezeigt 1.0.4 Kleine Fehlerkorrektoren - Verbesserung: In Mainscreens "Akku Voll", "Akku leer", "Akku lädt" nun besser lesbar, Symbole in Mainscreens öffnen nun meist verwendete Screens ---------------------------------------------------------------------- Versionen ---------------------------------------------------------------------- Verfügbare Versionen(jeweils Deutsch und Englisch): - Mr. Theo Bottomfeeder LED - Easy Colors - Beide Mainwindows farbige Textfelder, andere Screens Textfelder in gelber und weisser Farbe -------------------------------------------- Example Pictures - Beispielbilder -------------------------------------------- Lockscreen: Mainwindow 1 "Bad Eyes": Mainscreen 2 "More Informations", Mainscreen 2 "Mehr Informationen": ------------------------ Theme: ------------------------ Mr. Theo Bottomfeeder LED - Easy Colors - V1.0.4 German for DNA 75C DNA 250C.ecigtheme Mr. Theo Bottomfeeder LED - Easy Colors - V1.0.4 English for DNA 75C DNA 250C.ecigtheme -
Hallo Dennis, ist mir eben eingefallen - im EScribe-Programm befindet sich im Registerblatt "Allgemein" ein Button "Auf Werkseinstellungen zurücksetzen". Hast Du mit diesem Button schon versucht, Deinen DNA-Chip zurückzusetzen? Seltsamerweise tritt der "Menu Error - Press Up"-Fehler bei mir nicht auf allen Mods auf. Eigentlich nur auf zwei Mods, deren DNA-Chip bald darauf kaputt gegangen sind und dann von mir ausgetauscht werden mussten. Vielleicht liegt tatsächlich ein Fehler an einem Speicherfehler des Chips, der in der Folge zum Ausfall des Chips führt? Andere Themes bzw. DNA-Chips scheinen auch dieses Phänomen mit "Menu Error - Press Up" zu haben: https://forum.evolvapor.com/profile/209670-gxtx/content/ https://forum.evolvapor.com/topic/70298-dna-75-c-error/ - hier hat das erneute Installieren der Firmware den Fehler beseitigt. https://forum.evolvapor.com/profile/188254-warwolf_1/ - hier hat ein SP wohl den DNA gebrickt Also scheint mein Theme tatsächlich nicht für den "Menu Error"-Fehler verantwortlich zu sein. Mein Boxer BF DNA75C, Rebel BF DNA75C haben das Problem bisher nicht. Nur einer meiner Therion BF 75C und mein Boxer BF DNA 250C hatten wie erwähnt, das Problem. Und an beiden verabschiedete sich nach kurzer Zeit der Chip. Kann ein Zufall sein - oder auch nicht... Also eine recht diffuse Situation. Beste Grüsse --------------------------- Hello Dennis, I just remembered - in the EScribe program is in the tab sheet "General" a button named "Reset to factory settings". Did you already try to reset your DNA chip with this button? Strangely enough, the "Menu Error - Press Up" error does not occur on all my mods. Actually only on two mods whose DNA chip broke down soon afterwards and then had to be replaced by me. Maybe there is actually an error in a memory error of the chip as reason, which leads in the episode to the failure of the chip? Other themes or DNA chips also seem to have this phenomenon with "Menu Error - Press Up": https://forum.evolvapor.com/profile/209670-gxtx/content/ https://forum.evolvapor.com/topic/70298-dna-75-c-error/ - here the reinstallation of the firmware has fixed the error. https://forum.evolvapor.com/profile/188254-warwolf_1/ - here an SP has probably bricked the DNA So my theme does not seem to be responsible for the "Menu Error" error. My Boxer BF DNA75C, Rebel BF DNA75C have not had the problem yet. Only one of my Therion BF 75C and my Boxer BF DNA 250C had the problem as mentioned. And at both passed the chip after a short time. Can be a coincidence - or not... So it's a very diffuse situation in moment. Best regards
-
Hallo Dennis, oha - das ist mir neu, dass der Fehler auch bei anderen Themes auftritt. Dann kann eigentlich mein Theme doch nicht der Verursacher dieses Fehlers sein. Da ich auf allen meinen Geräten mein Theme installiert habe, kam ich gar nicht auf die Idee, dass der Fehler vielleicht doch an anderer Stelle zu suchen ist. In meinem Theme gibt es auf dem Screen "Geräte-Info" unten zwischen dem Button "Zurück" und "Mainscreen" einen Button für einen Device-Reset. Hast Du mit diesem Button schon versucht, den DNA-Chip zurück zu setzen? Vielleicht lässt sich hiermit der Fehler eliminieren. Ich bin gerade dabei, ein neues Theme - auf Grundlage dieses Themes - zu entwickeln. Und in diesem möchte ich ganz auf den Screen-Aufruf "Goto ChildScreen" verzichten. Gib mir bitte noch etwas Zeit für die Tests, dann lade ich den neuen Theme hier hoch und Du kannst testen, ob der Fehler mit dem neuen Theme immer noch auftritt - was dann bedeuten würde, dass meine Themes nicht die Ursache für die Fehlermeldung sein können. Beste Grüsse -------------------------- Hello Dennis, uh - that's new to me, that the error also occurs with other themes. In that case my theme can probably not be the cause of this error. Since I have installed my theme on all my devices, I did not even get the idea that the error might be in other themes as well. In my theme, there is a button on the screen "Device Info" below between the button "Back" and button "Mainscreen" for performing a device reset. Have you already tried with this button to reset the DNA chip? Maybe this will eliminate the error. I am currently developing a new theme based on this theme. And in this theme I would like to completely renounce any screen calls with "Goto ChildScreen". Please give me some more time for the tests, then I will upload the new Theme here and you can test this if the error still occurs in the new theme - which would mean that my themes can not be the cause of the error message. Best regards
-
Hallo Dennis, dieser Fehler ist mir bekannt und scheint leider wirklich von meinem Theme in Verbindung mit den eingeschränkten Möglichkeiten des Theme-Builders herzurühren. Grund ist folgender: Im Theme-Builder sind die Aufrufe anderer Screens(vereinfacht erklärt mit alten Basic-Befehlen) mit "Goto" und "Gosub" möglich. - Bei "Goto" (open Screen) speichert der Chip nicht, von welchem Screen aus der Folgescreen aufgerufen wurde. Ein Zurückblättern ist nicht möglich, sondern man muss durch einen neuen "Goto" die gewünschte andere oder vorherige Seite aufrufen. - Bei "Gosub" (open Childscreen) speichert der Chip die Screens, welche einen Folgescreen aufgerufen in einem sog. "Stack"(Stapel). Durch "Zurück"(Return) ist das Zurückblättern möglich, was es ermöglicht, auch in verschachtelten Screens, bis auf das Mainscreen zurückzublättern. Oder eben auch, wenn ein Screen von verschiedenen Quellen aus aufgerufen wird, situationsabhängig immer mit "Zurück" zu dem Screen zurückzukehren, von welchem aus dieser aufgerufen wurde. Da in meinem Theme die verschiedenen Screens aber nicht nur vom Menu, sondern eben auch von verschiedenen anderen Screens aus aufrufen werden können, ist eben diese Steuerung nicht immer fehlerfrei möglich, wenn der Gosub-Stack nicht bei einem folgenden "Goto" geleert wird, wie es bei den alten Basic-Dialekten der Fall war und es dabei dann zu einem Stack-Fehler oder einem Stack-Overflow kommt. Und eben dieses vermute ich in der Programmierung des DNA-Chips. Wenn man also bei der Benutzung des Screens öfters zwischen den Screens hin und her springt, läuft irgendwann der Gosub-Stack über und die "Error - Press Up"-Meldung erscheint. Ich bin gerade dabei, die Screen-Aufrufe meines Themes zu überprüfen, ob ich nicht vielleicht ganz auf "Gosub" verzichten und nur mit "Goto" arbeiten kann, denn ich denke (bin mir aber nicht restlos sicher), dass die hier beschriebenen Funktionen für den Fehler verantwortlich sind. Denn nur damit ist das Problem dieses Fehlers zu eliminieren, solange die Programmierung des DNA nicht geändert wird. Eventuell muss ich dann aber auf ein paar Aufrufmöglichkeiten der Screens aus anderen Screens heraus verzichten. Ich hoffe, ich konnte dies einigermassen verständlich erklären. Bitte gib mir hierfür etwas Zeit, da dies einen etwas umfangreicheren Umbau und Tests der neuen Version meines Themes erfordert. Beste Grüsse ------------------------ Hello Dennis, This error is known to me and unfortunately seems to really derive from my theme in connection with the limited possibilities of the Theme Builder. The reason is as follows: In the Theme Builder, it is possible to call other screens (simplified with old basic commands) with "Goto" and "Gosub". - With "Goto" (open screen) the chip does not save, from which screen the following screen was called. It is not possible to scroll backwards, but you have to call up the desired other or previous page with a new "Goto". - In "Gosub" (open child screen), the chip stores the screens, which called a subsequent screen in a so-called "stack" (stack). "Back"(Return) allows scrolling back to the main screen, even in nested screens. Or even if a screen is called from various sources, depending on the situation, always return with "Back" to the screen from which it was called. Since in my theme the different screens can be called not only from the menu, but also from different other screens, just this control is not always possible error-free, if the Gosub stack is not emptied at a following "goto", such as it was the case with the old Basic dialects. This occures a stack error or a stack overflow. And this is what I suspect in the programming of the DNA chip. So, if you frequently jump back and forth between the screens when using the screen, the Gosub stack eventually runs over and the "Error - Press Up" message appears. I am currently checking the screen-calls of my theme, if I can work without using "Gosub" and only work with "Goto" perhaps, because I think (but not completely sure) that the function, I described here responsible for the mistake. Because only with this, eliminating of this error is possible, as long as the programming of the DNA is not changed. Maybe I have to do without a few call options of some screens from other screens. I hope I could explain this reasonably understandably. Please give me some time to do this, as this will require a slightly larger remodeling and testing of the new version of my theme. Best regards
-
dna250c Minecraft
Mr.Bottomfeeder commented on infered5's file in DNA 75 Color, 100 Color, 250 Color
 You're welcome
 -
dna250c Minecraft
Mr.Bottomfeeder commented on infered5's file in DNA 75 Color, 100 Color, 250 Color
Hallo, wenn Du in Deiner Beschreibung unten auf "Dateioptionen" und dann "Details bearbeiten" klickst, kannst Du wieder das gewünschte Tumbnail für die Anzeige in der Übersichts-Liste der Themes auswählen. Dieses Procedere musst Du nach jedem Upload einer neuen Version wiederholen, da hierbei durch einen Fehler in der Foren-Software das Tumbnail verloren geht. Beste Grüsse --------------------------- Hello, If you click on "File Options" below in the description and then "Edit Details", you can select the desired thumbnail for the display in the overview-list of themes again. You have to repeat this procedure after each upload of a new version, because the tumbnail is getting lost by an error in the forum software. Best regards -
replay Gothic DNA250C / DNA75C Replay & Power bank
Mr.Bottomfeeder commented on copyman's file in DNA 75 Color, 100 Color, 250 Color
 Hallo, wenn Du in Deiner Beschreibung unten auf "Dateioptionen" und dann "Details bearbeiten" klickst, kannst Du wieder das gewünschte Tumbnail für die Anzeige in der Übersichts-Liste der Themes auswählen. Dieses Procedere musst Du nach jedem Upload einer neuen Version wiederholen, da hierbei durch einen Fehler in der Foren-Software das Tumbnail verloren geht. Beste Grüsse --------------------------- Hello, If you click on "File Options" below in the description and then "Edit Details", you can select the desired thumbnail for the display in the overview-list of themes again. You have to repeat this procedure after each upload of a new version, because the tumbnail is getting lost by an error in the forum software. Best regards
 -
The EScribe-Program and the Theme-Designer were easy to understand for me, cause I am a programer. But I think normal users shouldn't get problems with also. As I told, if you have questions, just write here. Important: I would suggest, before doing changes, backup (save) the origin EScribe-, Profile-, Wire- and other settings as well as the origin Theme from your HCigar onto your PC.
-
Hello Paul, You're welcome. No problem, if you write in english language. Your "HCigar VT75D" has a standard DNA75C-Chip built in. The "VT75D" is just the model-name of your HCigar Mod. So each theme for DNA75C runs on this Mod. Hope, I could help. If you have more questions, feel free to drop me a message again. Have fun with my theme. 🙂
-
Hallo, das scheint mir doch recht speziell zu sein und ich kann mir nicht so recht vorstellen, was Dir da genau vorschwebt. Aber da vermutlich alle Themes hier ohnehin der der "General Public Lizenz">=3 unterliegen, kannst Du natürlich gerne mein Theme als Grundgerüst für Dein eigenes verwenden und dieses dann selbst publizieren, solange Du mich als ursprünglichen Entwickler benennst und Dein Theme ebenfalls unter der GNU-Lizenz kostenfrei anbietest. Also...frisch ans Werk 🙂 Beste Grüsse
-
Hallo, wähle den passenden Download-Link bitte ganz unten in der Beschreibung im Block: "Was gibt es neues in der Version 2.0.3" Dort habe ich die zusätzlichen Varianten verlinkt. Beste Grüsse Mr. Theo Bottomfeeder Black and White I V2.0.3 German for DNA 75C.ecigtheme Mr. Theo Bottomfeeder Black and White V2.0.3 German for DNA 75C.ecigtheme P.S. Kannst Du mir bitte einen Link zu dem Theme von Elvui posten?
-
P.S. Hast Du es so gewollt, wie ich es jetzt als zusätzliche deutsche Versionen 2.0.3 hochgeladen habe? Beste Grüsse
-
Hallo, danke für die Anregung. Meinst Du eines in komplett schwarz/weiss? Kann ich Dir gerne machen. Ich denke, jetzt ist das Theme ziemlich ausgereift und es wird ohnehin wohl nicht mehr viele Updates geben. Vielleicht noch eines mit letzten Bugfixes und dann sollte es passen. Beste Grüsse Edit: Schwarz/Weiss auf allen Seiten oder alle Seiten und nur die beiden Mainscreens und den Lockscreen in Farbe belassen?
-
Version 2.1.3
2,420 downloads
This is a old and meanwhile overworked version of my theme. The actual version, you'll find here: Four different colorized variants of this theme are availiable too - "Full Color"-, two different "Black&White"- and a "Easy Colors"-Theme - each in english and german availiable - See below in "Other Versions..." English Description (Deutsche Beschreibung siehe unten) Theme : "Mr. Theo Bottomfeeder" for DNA 75C/250C Supports: - Replay - Powerbank - up to 4 Batterys - English and German GUI-Languages availiable - This Theme-Version was created by: Author: Hubert Allgäuer (Alias "Mr. Bottomfeeder"), Lake of Constance, Germany with using the program: "EScribe Suite V 2.0 with Service Pack 15.1" Here my very first Theme for the DNA75C/DNA250C (tested on Therion BF 75C, Rebel BF 75C and Boxer BF DNA250C) available in english and german language. It is a very comfortable, informative and comprehensive theme in black. Developed for all who wan't to have knowledge about all parameters of the DNA. No playful pictures, only information and all parameters of the DNA chip can be called up and displayed. But these are arranged in a unique, easily understandable and intuitive way. This theme is easy for viewing display in dark and bright background and not just well suited for developers and those who want to have full control over all the settings of the DNA chip but for all usual users as well. (The error in the lock-screen what is shown here in the Overview doessn‘t exist in real theme - see pic below. Hoping everything works well - if you find some problems or malfunctions or having wishes or questions, please feel free to drop me a note here. I would appreciate your comments on the usability of this theme, what you think about this theme, your suggestions for improvement and your wishes for furter updates. Wish to have fun with this theme Greetings Mr. Bottomfeeder Information: For using the Theme "Mr. Theo Bottomfeeder >= V 1.8.0" and the new Replay-Mode, you need the following Firmware on your Device. Otherwise this Theme can not be installed. Needed Firmware on the device: "1.1 SP 33.2 INT" or later version You can download Theme "Mr. Theo Bottomfeeder V.1.7.0" if you don't have a actual firmware on your device. Themes until V1.8.0 don't have a integrated Replay-Mode and works with older Firmwares. Selecting Mainscreen (Mainscreen 1 or Mainscreen 2 - Bad Eyes) Specifying which screen is defined as Mainscreen by de-/activating the button "Mainscreen" in the screen "Display" (Red = Mainscreen 1, Green = Mainscreen 2 "Bad Eyes") Mainscreen 1 and Mainscreen 2 "Bad Eyes": Upper side left: Percent-Value >>clicking opens Mainscreen 2 "Bad Eyes" or switches back to Mainscreen 1<< Upper right side: Voltage-Value >>clicking opens Screen "USB", if connected - otherwise opens screen "Pack"<< or Upper side: Pack-Level as graphic bar display >>clicking opens Screen "USB", if connected - otherwise opens screen "Pack"<< --Selecting what to show: By clicking the button "Pack Main" in the screen "Display"(Red=Numbers, Green=Pack-Level as graphic bar display)-- Voltage-state is displayed in different colors - depending on the battery level (green> = 66%, yellow> = 33% and <66%, red <33%). Charged full and Pack-Empty-Alert when using is displayed in relevant Screens ++Only in Mainscreen 1++: Below Pack-Display: Profile and Mode >>clicking one to select a Profile or Mode<< or Below Pack-Display: Date and Time >>clicking one opens Screen "System"<< or Below Pack-Display: Big Time >>clicking opens Screen "System"<< --Selecting what to show: By de-/activating the two buttons "In Main" in the screen "System" - Left button = switching Profile and Mode (red) or time display (green), right button = if time display is activated switching between date and time (blue) or big time (yellow)-- or If firing, a flame symbol appears at this place ++Only in Mainscreen 1++: Above the lower information line: The contents for output values for the lower three fields can be choosen in Screen "Display": Left display: Switch "Volt/Watt" - Coil voltage(Red)/coil power(Green) Right display: Switch "Ampere/Ohm" - Coil current(Red)/Coil Resistant(Green) Lower display: Switch "Puff/Puffs" - duration of the current Puff(Red) / total number of Puffs since reset(Green) Symbols (Mainscreen 1 and Mainscreen 2 "Bad Eyes"): "Lightning" with three modes 1. Grey lightning is displayed in Watt-Mode, if Boost is deactivated or in other Modes Preheat is not activated >>clicking opens Screen "Profile"<< 2. Yellow lightning is displayed in Watt-Mode, if Boost is activated >>clicking opens Screen "Profile"<< 3. Switch (blue and red lightning) is displayed, if Pre-Heat (only in Not-Watt-Modes availiable) is activated >>clicking the lightning switches display between:<< - Red lightning (switch is Off) and Temp-Control is activated: Upper side Coil-Temperature - Lower side: Pre-Heat-Temperature - Red lightning (switch is Off) and Temp-Control is deactivated: Upper side Coil-Power - Lower side: Pre-Heat-Temperature - Blue lightning (switch is On) and Temp-Control is activated: Upper side Pre-Heat-Power - Lower side: Punch-Level - Blue lightning (switch is On) and Temp-Control is deactivated: Upper side Pre-Heat-Power - Lower side: Punch-Level --Selecting what to show: If Pre-Heat is activated and depending on whether Temp-Control is on or off, you can toggle the output what is specified here-- "Flame" with two modes >>clicking opens Screen "TC/Pre-Heat"<< 1. Grey flame, if no Pre-Heat is activated 2. Colored flame , if Pre-Heat is activated "Thermometer" with two modes >>clicking opens Screen "Settings 1"<< 1. Strikethrough, if no activated Temp-Control or coil with no Temp Sensing Material or coil with Temp Sensing Material but no Temp Sensing detected (wrong coil-wire for choosen Profile or coil with contact problems - fluctuating coil-resistance) 2. Colored if actual Profile is Temp-Controlled "Coil" with six modes >>clicking opens Screen "Info-Power"<< 1. Blue coil with both pins down: If Boost deactivated and no Temp-Sense-Material and no Temp-Sence Detect (usual Watt-mode) 2. Blue coil with right pin up: If Boost activated and no Temp-Sense-Material and no Temp-Sense detect (usual Watt-mode with Boost) 3. White coil with both pins down: If Temp-Control deactivated and Temp-Sense-Material but no Temp-Sense detected (mostly no Temp-Control with Temp Sensing wire - but wrong TC-wire used or contact-problems - - fluctuating coil-resistance) 4. White coil right pin up: If Temp-Control activated and Temp-Sense-Material but no Temp-Sense detected (mostly Temp-Control with Temp Sensing wire - but wrong TC-wire used or contact-problems - - fluctuating coil-resistance) 5. Red coil both pins down: If Temp-Sense-Material and Temp-Sense detect but no Temp-Control activated (TC-wire with not activated Temp-Control) 6. Red coil right pin up: If Temp-Sense-Material and Temp-Sense detected and Temp-Control activated (full working Temp Sensing Mode, TC-wire with activated Temp-Control) Replay: Bottom Center: "Replay"-Buttons (like on a Cassette-Recorder). - Grey: Replay is deactivated - Halt-Symbol (two red vertical bars): Replay is on - Record-Symbol (a filled red circle): Replay has recorded a puff and is ready for playing - Play-Symbol (a filled red triangle): Replay is playing When Replay is Playing, the words "Replay" and "active" are displayed in big yellow chars in both Mainscreens. Additional a graphic bar display for control Replay warmth is shown. Mainscreen 1 and Mainscreen 2 "Bad eyes": Icon below right - Lockscreen (Symbol "Bed") or Mainscreen 1 (Symbol "House") / Mainscreen 2 Screen "Bad Eyes" (Symbol "Glasses") Function of the lower right symbol in Mainscreen switches the lower right symbol in all screens (except Lockscreen and Mainscreens) either back to Mainscreen 1 or Mainscreen 2 ("Bad Eyes") depending on the selection of the switch "Mainscreen" in the screen "Display". Due to the limitation of the software, the Mainscreen 1 will always be displayed after unlocking the device, even if Mainscreen 2 ("Bad Eyes") is activated as Mainscreen. In this case, the Mainscreen 2 ("Bad Eyes") can be accessed again by simply clicking on the lower right icon. - Specify which screen is defined as Mainscreen by de-/activating the button "Mainscreen" in the screen "Display" (Red = Mainscreen 1, Green = Mainscreen 2 "Bad Eyes") - ++Only in Mainscreen2++: While firing, a flame symbol appears instead of the lower six Symbols at this place All other elements should be self-explanatory. Origin DNA-Datasheet: 'Replay is intended to capture the flavor and satisfaction of the “perfect puff” and provide the same level of performance and consistency on all subsequent puffs. The use of Nickel, Stainless, Titanium, or other material that increases in resistance when heated is required. In addition, Replay will also prevent dry hits when used with wattage control. To use Replay set the device to the desired power level and operate it normally. Once a satisfying puff is achieved, activate the feature to save and replay the saved puff each time the device is fired. Puff length is not a factor and the user will not be limited to the length of the previous puff. Disable Replay to resume normal operation or find a new puff to save. If Replay cannot be enabled the coil is not compatible. ' (Source: https://downloads.evolvapor.com/dna75color.pdf) Activating Replay-Mode: The Replay-Mode is changeable seperately for each Profile. It can be activated directly in this theme, if choosing in the "Replay"-Page ("Menu 1" - "Replay"). Also the activation of the Replay-Mode can be done in the Profile-Settings in the EScribe-Program and uploading the changed Profile-Settings onto your device then. If the Replay-Mode is activated, the standard grey Replay-Symbol on both Main-Pages of this theme is changing into a "Halt"-Symbol (two red standing bars - similar the "Halt"-Button on a tape-machine). Recording a puff for Replay: If the Replay-Mode is activated, you have to puff some times for initializing the Replay-Mode. As soon the Replay-Mode is prepared for recording a puff, the "Halt"-Symbol on Mainscreen changes into a red filled circle (like the "Record"-Button on a tape-machine). Now you can click the "Record"-Symbol after you had a puff that fully meets your expectations. Play a recorded puff in Replay (always repeated): As soon, as a puff is recorded, the Replay-Symbol changes into a red Triangle "Play"-Symbol (also like the "Play"-Button on a Tape-Machine). Additionally the word "Repeat" is displayed in big yellow chars on both Main-Screens of the Theme. That shows, the previous recorded puff will be repeated endless now. Stop Replay-Mode: For ending the Replay-loop, just click onto the red "Play"-Symbol. The yellow "Replay"-Name dissappears from the Main-Screens and the Replay-Symbol changes back into the red filled Circle "Record"-Symbol. The Device went back into normal using-mode now. By clicking the "Record"-Symbol again, the last puff will be saved and the Replay-Mode changes into the Play-Mode. BE AWARE! Don't activate the checkbox "Puff saved, playing" in the Profile-Settings of your EScribe-Program. Just activate the checkboxes "Use replay on this profile". If activating the checkboxes "Puff saved, playing" at this point, the Replay mode would be activated - but without a recorded favourite puff, what could cause malfunctions. History: 1.7.0 Version without Replay-Mode for older firmware-Devices 1.8.0 Implemented Replay-Mode (DNA 75C and DNA 250C) 1.8.1 Implemented in Screen "Pack" Power-Bank function settings (only DNA 250C) 1.8.2 Moved Power-Bank function settings into USB-Screen now (only DNA 250C) 1.8.3 Implemented in Screen "Pack" displaying different Voltages from up to 4 Batterys in the device 1.8.4 Voltage fields repaired - will be displayed correct now, if >10V. 1.8.5 Now voltages on DNA75C-devices with 2 Decimal Places, on DNA250C-devices with 1 Decimal Place 1.8.6 Bugfixes and switchable Outputs "Voltage or Ampere" and "Wattage or Ohms) for Mainscreen (chooseable in "Menu 1" - "Display") 1.8.7 Splitted switches for "Volt or Watt" and "Ampere or Ohm" and "Puff Duration or Puff Count" in Mainscreen (chooseable in "Menu 1" - "Display") 1.8.8 Minor Bugfixes 1.8.9 Pre-Head-Symbol integrated 1.9.0 In Lockscreen different Symbols for USB/Data-Connection/Powerbank 1.9.1 Bugfix: Translations and repaired too small fields, if using unit °F 1.9.2 Bugfix for show "Playing" 1.9.3 Symbol "P" for "Punch" moved from right "Flame"-symbol into left "Lightning"-Symbol 1.9.4 Added adjustable Boost-Level and Punch-Level in Mainscreen 1 and Mainscreen2(Bad Eyes-Screen) 1.9.5 Manual switch in "TC/Pre-Heat"-Screen for choosing displayed Pre-Heat-Temp and Pre-Heat-Punch-Level in Mainscreen if Pre-Heat is activated 1.9.6 New switch in Mainscreens for toogle between displaying Punch-Level and Temperature if Prehead is active 1.9.7 Overworked Screen "TC/Pre-Heat" and Mainscreens 1.9.8 Added Slider for Warmth on Mainscreens. Is shown, if Replay is active 1.9.9 Screen "Coil-Power" replaced by screen "Profile" 2.0.0 Mainscreens displaying of "Replay" improved 2.0.1 Minor Bugfixes 2.0.2 Switch for Toogle Punch-Values in Mainscreen now is red and blue Lightning, Switch added in screen "Profile" for Pre-Heat On/Off 2.0.3 Minor Bugfixes 2.0.4 Minor changes 2.0.5 Bugfix "Pack empty" and "Replay active" is displayed correct now in Mainscreens, minor changes stepsize optimized for some values 2.0.6 Bugfix: Repaired switching back from Screen "Bad Eyes" to "Mainwindow" - Addition: Alternative Pack-Level as graphic bar display in both Mainscreens. Button in Screen "Display" - Switch "Pack Main" for displaying either Digital Values for Pack-Level and Pack-Voltage or Pack-Level as graphic bar display 2.0.7 Bugfix: Displaying text "Pack" ("full", "empty") in Mainwindow and screen "Bad Eyes" now works 2.0.8 Bugfix: Voltage in Mainwindow and screen "Bad Eyes" now shown in only one line as well if voltage >= 10V, Border lines in all windows removed, because not exactly placed displays shows this problem with border lines 2.0.9 Minor Bugfixes: Now "Pack full" doessn't appears after connecting USB-Wire - - Improvement: This manual, Structure of some screens, Battery icon in Lockscreen now shows in color the charge level - Addition: Displaying Profile and Mode in "Mainscreen 1" now is exchangeable into displaying Date and Time or big Time by activating in screen "System" the two new buttons "In Main" - Selecting by de-/activating the button "In Main" in the screen "System" - Left button = switching Profile and Mode (red) or time display (green), right button = if time displaying is activated switching between date and time (blue) or big time (yellow) 2.1.0 Bugfix: Bar-Display for Battery level repaired on screen "Bad Eyes", Improvement: Screen "Menu 1" improved, Addition: Function of bottom right icon in Mainscreen is now switchable between "Lockscreen" and Screen "Mainscreen 1" or "Mainscreen 2" (Screen "Bad Eyes") by de-/activating button "Off in Main" in Screen "Display" . 2.1.1 Smaller and bigger bugfixes, Improvement: "Mainscreen 1" click on voltage-display opens screen "USB" if connected, if not connected click opens screen "Pack" - graphic bar-display for battery_level now also with "Pack empty" -Warning and click opens screen "USB" when connected when not connected click opens screen "Pack", Screen "Menu 1" entry "Profiles / Coil" splitted, Screen "Coil" completely reworked, Screen "Info Temp / Ohm" entry "Board Temperature" added, Screen "About" entry "mWh since reset" added 2.1.2 Improvement: Fixed selection of the Mainscreen (Mainscreen 1 or Mainscreen 2 "Bad Eyes") is possible now. Depending on the selection of the "Mainscreen" button in the "Display" screen, the lower right icon in all screens now switches back to either Mainscreen 1 or Mainscreen 2 ("Bad Eyes"). Due to the limitation of the software, the Mainscreen 1 will always be displayed after unlocking the device, even if Mainscreen 2 ("Bad Eyes") is activated as mainscreen. In this case, the Mainscreen 2 ("Bad Eyes") can be accessed again by simply clicking on the lower right icon. 2.1.3 Bug fix: In screen "Lock/Unlock" now the setting for "Auto-Lock" delay time works correct, small further errors eliminated. Improvement: Screen "New Coil" optimized, in Screen "Display" the text boxes now show the state of the switch-settings, in both Mainscreens the graphic bar display for Replay-Heat embellished. -> And now the moment seems to has come where I can't find other possible improvements for this theme anymore (and the memory of the DNA is almost full with this theme-version - 99.2%) - but I am now thinking about developing a new theme with less information and more artistic elements. P.S. There are month of work in this theme. Therefore, I would appreciate a small donation from those who love this theme so much that they like to use it. Many Thanks My PayPal-Mail-Address is: eBoy@lake-of-konstanz.de Availiable Versions(each in English and German): - Mr. Theo Bottomfeeder Black - Full Color - all Screens are full colorized - Mr. Theo Bottomfeeder Black - Easy Colors - text-fields in all screens yellow and white, but Mainwindows stays colorized - Mr. Theo Bottomfeeder Black - Nearly Black and White - text-fields in all screens mostly monochrome, but Mainwindows stays colorized - Mr. Theo Bottomfeeder Black - Pure Black and White - all text-fields in all screens monochrome in white also in Mainwindows ---------------------------------------------------------------------- Dies ist eine inzwischen veraltete und nicht mehr aktuelle Version meines Themes Die aktuelle und komplett überarbeitete Version findet Ihr hier: Vier verschieden kolorierte Varianten dieses Themes sind hier verfügbar - "Full Color"-, zwei verschiedene "Black & White"- und ein "Easy Colors"-Themen - jeweils in Englisch und Deutsch verfügbar - siehe unten in "Verfügbare Versionen" Deutsche Beschreibung (English Description see upper text) Theme: "Mr. Theo Bottomfeeder" für DNA 75C/250C Unterstützt: - Replay - Powerbank - bis zu 4 Akkus - Englische und deutsche GUI-Sprachen verfügbar - Diese Theme-Version wurde erstellt von: Autor: Hubert Allgäuer (Alias "Mr. Bottomfeeder"), Bodensee, Deutschland mit dem Programm: "EScribe Suite V 2.0 mit Service Pack 15.1" Hier mein erstes Theme für die DNA 75C/DNA250C (getestet mit Therion BF 75C, Rebel BF 75C und Boxer BF DNA250C) in englischer und deutscher Sprache. Es ist ein sehr komfortables, informatives und umfassendes Theme in Schwarz. Entwickelt für alle, die über sämtliche Parameter der DNA Bescheid wissen wollen. Keine verspielten Bildchen, nur Informationen und sämtliche Parameter des DNA-Chips abrufbar und angezeigt. Aber diese dafür in einzigartiger Weise leicht verständlich und intuitiv bedienbar arrangiert. Dieses Theme ist in dunkler und heller Umgebung leicht abzulesen und nicht nur gut geeignet für Entwickler und diejenigen, die die volle Kontrolle über alle Einstellungen des DNA-Chips haben wollen, sondern auch für alle normalen Benutzer. (Der Fehler im Lock-Screen, welcher hier in der Übersicht angezeigt wird, existiert es im realen Theme nicht - siehe Bild unten. Ich hoffe, dass alles gut funktioniert - wenn Ihr Probleme oder Fehlfunktionen feststellt oder Wünsche oder Fragen habt, können Ihr mir gerne eine Nachricht hinterlassen. Über Eure Kommentare zur Brauchbarkeit dieses Themes würde mich mich sehr freuen, auch über Eure Meinung zu diesem Theme, über Verbesserungsvorschläge und Eure Wünsche für künftige Updates. Viel Spaß mit diesem Theme Beste Grüße Mr. Bottomfeeder Information: Zur Verwendung des Themes "Mr. Theo Bottomfeeder> = V 1.8.0" und des neuen Replay-Modus benötigt Ihr folgende Firmware auf Eurem Gerät. Ansonsten kann dieses Theme nicht installiert werden. Benötigte Firmware auf dem Gerät: "1.1 SP 33.2 INT" oder höhere Version. Ihr könnt das Theme "Mr. Theo Bottomfeeder V.1.7.0" herunterladen, wenn Ihr keine aktuelle Firmware auf Eurem Gerät habt. Themes vor V1.8.0 haben keinen integrierten Replay-Modus und arbeiten daher auch mit älterer Firmware. Auswahl des Mainscreens (Mainscreen 1 oder Mainscreen 2 - "Bad Eyes") Festlegen, welche Screen als Mainscreen definiert wird, durch De-/Aktivieren der Schaltfläche "Mainscreen" im Screen "Anzeige" (Rot = Mainscreen 1, Grün = Mainscreen 2 "Bad Eyes") Mainscreen 1 und Mainscreen 2 "Bad Eyes": Oben links: Akku-Level in Prozent >>Klick öffnet Mainscreen 2 "Bad Eyes" bzw. schaltet zurück auf Mainscreen 1<< Rechts oben: Akku-Spannung >>Klick öffnet Screen "USB", wenn verbunden - andernfalls wird Screen "Akku" geöffnet<< oder Oben: Graphische Balken-Anzeige für Akku-Level >>Klick öffnet Screen "USB", wenn verbunden - andernfalls wird Screen "Akku" geöffnet<< --Auswählen was angezeigt werden soll: Durch Anklicken der Schaltfläche "Akku Main" im Screen "Display" (Rot=Zahlen, Grün=Graphische Balken-Anzeige für Akku-Level)-- Der Akkuzustand wird in verschiedenen Farben angezeigt - abhängig vom Akku-Level (Grün >= 66%, Gelb >= 33% und <66%, Rot < 33%) Der Akku-Voll- und Akku-Leer-Alarm wird bei der Verwendung in den entsprechenden Screens angezeigt ++ Nur in Mainscreen 1++: Unterhalb der Akku-Anzeige: Profil und Modus >>eines Anklicken zur Auswahl eines Profils oder Modus<< oder Unterhalb der Akku-Anzeige: Datum und Uhrzeit >>eines Anklicken öffnet Screen "System"<< oder Unterhalb der Akku-Anzeige: Grosse Uhrzeit >>Anklicken öffnet Screen "System"<< --Auswählen was angezeigt werden soll: durch De-/Aktivieren der zwei Schaltflächen "In Main" im Screen "System" - Linker Button = Umschalten Profil und Modus (rot) oder Zeitanzeige (grün), rechter Button = Bei aktivierter Zeitanzeige Umschalten Datum und Zeit (blau) oder grosse Uhrzeit (gelb)-- oder Wenn gefeuert wird erscheint stattdessen ein Flammensymbol ++ Nur in Mainscreen 1++: Über der unteren Informations-Zeile: Die Inhalte für die Ausgabewerte für die unteren drei Felder können im Screen "Anzeige" ausgewählt werden: Linke Anzeige: Schalter "Volt/Watt" - Coil-Spannung(Rot)/Coil-Leistung(Grün) Rechte Anzeige: Schalter "Ampere/Ohm" - Coil-Strom(Rot)/Coil-Widerstend(Grün) Untere Anzeige: Schalter "Zug/Züge" - Dauer des aktuellen Zugs(Rot)/Gesamtanzahl der Züge seit Reset(Grün) Symbole (Mainscreen 1 und Mainscreen 2 "Bad Eyes"): "Blitz" mit drei Modi 1. Grauer Blitz wird angezeigt, wenn wenn im Watt-Modus Boost deaktiviert oder in anderen Modi Vorheizen nicht aktiviert ist >>Anklicken öffnet Screen "Profil"<< 2. Gelber Blitz wird angezeigt, wenn wenn im Watt-Modus Boost aktiviert wurde >>Anklicken öffnet Screen "Profil"<< 3. Schalter (blauer oder roter Blitz) wird angezeigt, wenn Vorheizen (nur in Nicht-Watt-Modi verfügbar) aktiv ist >>Umschalten zwischen folgenden Anzeigen durch Anklicken des Blitz-Symbols<< - Roter Blitz: (Schalter ist ausgeschaltet) und Temp-Control aktiviert: Oben Coil-Temperatur - Unten: Vorheizen-Temperatur - Roter Blitz: (Schalter ist ausgeschaltet) und Temp-Control deaktiviert: Oben Coil-Leistung - Unten: Vorheizen-Temperatur - Blauer Blitz: (Schalter ist eingeschaltet) und Temp-Control aktiviert: Oben Vorheizen-Power - Unten: Punch-Level - Blauer Blitz: (Schalter ist eingeschaltet) und Temp-Control deaktiviert: Oben Vorheizen-Leistung - Unten: Punch-Level --Auswählen, was angezeigt werden soll: Wenn Vorheizen aktiviert ist, kann abhängig davon, ob Temp-Control ein- oder ausgeschaltet ist, die hier angegebene Anzeige umgeschaltet werden-- "Flamme" mit zwei Modi >>Anklicken öffnet Screen "TC/Vorheizen"<< 1. Graue Flamme, wenn kein Vorheizen aktiviert ist 2. Farbige Flamme, wenn Vorheizen aktiviert ist "Thermometer" mit zwei Modi >>Anklicken öffnet Screen "Einstellungen 1"<< 1. Durchgestrichen, wenn keine Temp-Control oder Coil ohne Temp Sensing Material oder Coil mit Temp Sensing Material aktiviert wurde, aber keine Temp Sensing erkannt wurde (falscher Coildraht für gewähltes Profil oder Verdampfer mit Kontakt-Problem - schwankender Coil-Widerstand) 2. Farbig, wenn Temp-Control aktiviert ist "Wicklung" mit sechs Modi >>Anklicken öffnet Screen "Info-Power"<< 1. Blaue Wicklung mit beiden Pins nach unten: Wenn Boost deaktiviert ist und kein Temp-Sense-Material und kein Temp-Sence-Detect (üblicher Watt-Modus) 2. Blaue Wicklung mit rechtem Pin nach oben: Wenn Boost aktiviert ist und kein Temp-Sense-Material und kein Temp-Sense-Detect (üblicher Watt-Modus mit Boost) 3. Weiße Wicklung mit beiden Pins nach unten: Wenn Temp-Control deaktiviert aber Temp-Sense-Material, aber kein Temp-Sense erkannt wurde (meistens kein Temp-Control mit Temp-Sensing-Draht - aber falscher TC-Draht verwendet oder Verdampfer mit Kontaktproblem - schwankender Coil-Widerstand) 4. Weiße Wicklung mit rechtem Pin nach oben: Wenn Temp-Control aktiviert und Temp-Sense-Material, aber kein Temp-Sense erkannt wurde (meistens Temp-Control mit Temp-Sensing-Draht - aber falscher TC-Draht verwendet oder Verdampfer mit Kontaktproblem - schwankender Coil-Widerstand) 5. Rote Wicklung mit beiden Pins nach unten: Wenn Temp-Sense-Material und Temp-Sense erkannt werden, aber keine Temp-Control aktiviert ist (TC-Draht aber nicht aktivierter Temp-Control) 6. Rote Wicklung mit rechtem Pin nach oben: Wenn Temp-Sense-Material und Temp-Sense erkannt werden und Temp-Control aktiviert ist (voll funktionierender Temp-Sensing-Modus, TC-Draht mit aktivierter Temp-Control) Replay: Unten Mitte: "Replay" -Buttons (wie bei einem Kassetten-Recorder). - Grau: Replay ist deaktiviert - Stop-Symbol (zwei rote vertikale Balken): Replay ist aktiviert - Record-Symbol (ein gefüllter roter Kreis): Replay hat einen Zug aufgezeichnet und ist bereit zum Abspielen - Play-Symbol (ein gefülltes rotes Dreieck): Replay wird abgespielt Während der Wiedergabe werden die Wörter "Replay" und "aktiviert" in großen gelben Zeichen auf beiden Mainscreens angezeigt. Zusätzlich wird eine Balken-Anzeige für die Einstellung der Replay-Wärme eingeblendet. Mainscreen 1 und Mainscreen 2 "Bad eyes": Symbol unten rechts - Lockscreen (Symbol "Bett") oder Mainscreen 1 (Symbol "Haus") / Mainscreen 2 Screen "Bad Eyes" (Symbol "Brille") Funktion des unteres rechtes Symbols in Mainscreen schaltet abhängig von der Auswahl des Schalters "Mainscreen" im Screen "Anzeige" das untere rechte Symbol in allen Screens (ausser Lockscreen und Mainscreens) entweder zurück auf Mainscreen 1 oder Mainscreen 2("Bad Eyes"). Bedingt durch die Limitation der Software wird nach dem Unlock des Gerätes immer das Mainscreen 1 angezeigt, auch wenn Mainscreen 2 ("Bad Eyes") als Mainscreen aktiviert ist. In diesem Fall kann das Mainscreen 2 ("Bad Eyes") durch einfaches Anklicken des unteren rechten Symbols wieder aufgerufen werden. -- Festlegen, welche Screen als Mainscreen definiert wird, durch De-/Aktivieren der Schaltfläche "Mainscreen" im Screen "Anzeige" (Rot = Mainscreen 1, Grün = Mainscreen 2 "Bad Eyes")-- ++ nur in Mainscreen 2 ("Bad Eyes")++: Während gefeuert wird erscheint statt der sechs unteren Symbolen ein Flammensymbol Alle anderen Elemente sollten selbsterklärend sein. Origin DNA-Datenblatt(Übersetzung): "Replay soll den Geschmack und die Zufriedenheit des 'perfekten Puffs' erfassen und bei allen folgenden Zügen die gleiche Leistung und Konsistenz bieten. Die Verwendung von Nickel, Edelstahl, Titan oder einem anderen Material, das den Widerstand beim Erhitzen erhöht, ist erforderlich. Darüber hinaus verhindert Replay bei Verwendung der Wattzahlkontrolle auch das Auftreten von Trockenschlägen (Dry-Hits). Um Replay zu verwenden, stellen Sie das Gerät auf die gewünschte Leistungsstufe ein und betreiben Sie es normal. Sobald ein zufriedenstellender Zug erreicht ist, aktivieren Sie die Funktion zum Speichern und Wiedergeben des gespeicherten Zuges jedes Mal, wenn die Feuertaste betätigt wird. Die Länge des Puffs ist kein Faktor und der Benutzer ist nicht auf die Länge des vorhergehenden Puffs beschränkt. Deaktivieren Sie Replay, um den normalen Betrieb fortzusetzen oder einen neuen Puff zum Speichern zu finden. Wenn Replay nicht aktiviert werden kann, ist die Coil nicht kompatibel." (Quelle: https://downloads.evvolpapor.com/dna75color.pdf) Replay-Modus aktivieren: Der Replay-Modus ist für jedes Profil einzeln änderbar. Es kann direkt in diesem Theme aktiviert werden, wenn diese Funktion in der "Replay"-Screen ("Menu 1" - "Replay") aktiviert wird. Auch kann die Aktivierung des Replay-Modus in den Profil-Einstellungen im EScribe-Programm erfolgen und dann die geänderten Profil-Einstellungen auf das Gerät hochgeladen werden. Wenn der Replay-Modus aktiviert ist, wechselt das graue Standard-Replay-Symbol auf beiden Main-Pages dieses Themes in ein "Stop" -Symbol (zwei rote stehende Balken - ähnlich dem "Pause" -Button auf einem Cassetten-Recorder) . Aufnahme eines Zugs für Replay: Wenn der Replay-Modus aktiviert ist, müssen Sie einige Male dampfen, um den Replay-Modus zu initialisieren. Sobald der Replay-Modus für die Aufnahme eines Zugs vorbereitet ist, wechselt das "Pause"-Symbol auf dem Mainscreen in einen roten gefüllten Kreis (wie der "Aufnahme" -Button auf einem Cassetten-Recorder). Jetzt können Sie das "Aufnahme" -Symbol Anklicken, nachdem Sie einen Zug hatten, der Ihre Erwartungen voll erfüllt. Wiederholen eines aufgezeichneten Zugs in Replay (wird immer wiederholt): Sobald ein Zug aufgezeichnet wird, verwandelt sich das Replay-Symbol in ein rotes Dreieck "Play" -Symbol (auch wie der "Play" -Button auf einem Cassetten-Recorder). Zusätzlich werden die Worte "Replay" und "aktiviert" in großen gelben Zeichen auf beiden Mainscreens des Themes angezeigt. Das zeigt an, dass der vorher aufgezeichnete Zug nun endlos wiederholt wird. Beenden/Unterbrechen des Replay-Modus: Um den Replay-Loop zu beenden, klicken Sie einfach erneut auf das rote "Play" -Symbol. Der gelbe "Replay"-Name verschwindet von den Mainscreens und das Replay-Symbol wechselt zurück in den rot gefüllten Kreis "Aufnahme"-Symbol. Das Gerät ist jetzt wieder in den normalen Benutzungsmodus zurückgekehrt. Durch erneutes Anklicken des "Aufnahme"-Symbols wird der letzte Zug gespeichert und der Replay-Modus wechselt in den Play-Modus. VORSICHT! Aktivieren Sie in den Profil-Einstellungen Ihres EScribe-Programms nicht die Checkbox "Puff saved, playing". Aktivieren Sie einfach die Kontrollkästchen "Use replay on this profile". Wenn Sie an dieser Stelle die Checkboxen "Puff saved, playing" aktivieren, wird der Replay-Modus aktiviert - allerdings ohne einen aufgezeichneten Lieblings-Puff, was zu Fehlfunktionen führen kann. Historie: 1.7.0 Version ohne Replay-Modus für Geräte mit älterer Firmware 1.8.0 Implementierter Replay-Modus (DNA 75C und DNA 250C) 1.8.1 Implementiert in Akku-Screen Power-Bank-Funktionseinstellungen (nur DNA 250C) 1.8.2 Power-Bank-Funktionseinstellungen jetzt in USB-Screen verschoben (nur DNA 250C) 1.8.3 Im Akku-Screen Akku-Anzeige implementiert, die verschiedene Spannungen von bis zu 4 Akkus im Gerät anzeigt 1.8.4 Spannungsfelder repariert - wird jetzt korrekt angezeigt, wenn > 10V. 1.8.5 Jetzt Spannungen an DNA75C-Geräten mit 2 Dezimalstellen, auf DNA250C-Geräten mit 1 Dezimalstelle 1.8.6 Bugfixes und schaltbare Ausgänge "Volt oder Ampere" und "Watt oder Ohm" für MainScreen (wählbar in "Menu 1" - "Display") 1.8.7 Geteilte Schalter für "Volt oder Watt" und "Ampere oder Ohm" und "Zug-Dauer oder Zug-Anzahl" im Mainscreen (wählbar in "Menü 1" - "Anzeige") 1.8.8 Kleinere Bugfixes 1.8.9 Vorheizen-Symbol integriert 1.9.0 Im Sperr-Screen verschiedene Symbole für USB/Datenverbindung/Powerbank 1.9.1 Bugfix: Übersetzungen und reparierte zu kleine Felder, wenn Einheit °F verwendet wurde 1.9.2 Bugfix für die Anzeige "Playing" 1.9.3 Symbol "P" für "Punch" wurde vom rechten "Flame" -Symbol in das linke "Lightning" -Symbol verschoben 1.9.4 Anzeige von Boost-Level und Punch-Level in MainScreen 1 und MainScreen2 (Bad Eyes-Screen) hinzugefügt 1.9.5 Manuelle Umschaltung im "TC/Vorheizen"-Screen zur Auswahl der angezeigten Vorheizen-Temp- und Vorheizen-Punch-Level im Mainscreen, wenn Vorheizen aktiviert ist 1.9.6 Neuer Schalter in den Mainscreens für die Anzeige von Punch-Level und -Temperatur, wenn Vorheizen aktiv ist 1.9.7 Überarbeitete Screen "TC/Vorheizen" und Mainscreen 1.9.8 Hinzugefügt Slider für Replay-Wärme auf Mainscreens. Wird angezeigt, wenn Replay aktiv ist 1.9.9 Screen "Coil-Power" ersetzt durch Screen "Profil" 2.0.0 Die Mainscreen-Anzeige von "Replay" wurde verbessert 2.0.1 Kleinere Bugfixes 2.0.2 Schalter für Umschaltung Punch-Werte im Mainscreen ist nun roter und blauer Blitz, Schalter in dem Screen "Profil" für Vorheizen Ein/Aus hinzugefügt 2.0.3 Kleinere Bugfixes 2.0.4 Geringfügige Änderungen 2.0.5 Bugfix "Akku leer" und "Replay aktiv" wird jetzt korrekt in Mainscreens angezeigt, kleinere Änderungen werden für bestimmte Werte optimiert 2.0.6 Bugfix: Repariertes Zurückschalten vom Screen "Bad Eyes" auf "Mainwindow" - Zusatz: Alternative Anzeige für Akku-Level in beiden Mainscreens. Schaltfläche im Screen "Display" - Neuer Schalter "Akku Main" im Screen "Display" zur Anzeige von entweder digitalen Werten für Akku-Level und Akku-Voltage oder graphische Balken-Anzeige für Akku-Level 2.0.7 Bugfix: Anzeige des Textes "Akku" ("full", "empty") im Mainscreen und Screen "Bad Eyes" funktioniert jetzt 2.0.8 Bugfix: Spannung im Mainscreen und Screen "Bad Eyes" wird nun auch in nur einer Zeile angezeigt, wenn Spannung> = 10V, Randlinien in allen Screens entfernt, da nicht genau platzierte Displays diesen Montagefehler mit Randlinien sichtbar machten 2.0.9 Kleinere Bugfixes: "Akku voll" erscheint nicht direkt mehr nach dem Verbinden mit USB-Kabel - Verbesserungen: Diese Anleitung, Struktur einiger Screens, Akkusymbol in Lockscreen zeigt jetzt farbig den Ladelevel an - Erweiterung: Die Anzeige von Profil und Modus in "Mainscreen 1" kann nun durch die Aktivierung der zwei neuen Buttons "In Main" im Screen "System" in die Anzeige von Datum und Uhrzeit oder grosse Uhrzeit umgeschaltet werden - Linker Button = Umschalten Profil/Modus (rot) oder Zeitanzeige (grün), rechter Button = Bei aktivierter Zeitanzeige Umschalten Datum und Zeit (blau) oder grosse Uhrzeit (gelb). 2.1.0 Bugfix: Balken-Anzeige für Akku-Level im Screen "Bad Eyes" repariert, Verbesserung: Screen "Menu 1", Zusatz: Funktion des unteres rechtes Symbols in Mainscreen ist jetzt umschaltbar zwischen "Lockscreen" und "Mainscreen 1" bzw. "Mainscreen 2"(Screen "Bad Eyes") durch De-/Aktivieren der Schaltfläche "Aus in Main" im Screen "Anzeige". 2.1.1 Kleinere und grössere Bugfixes, Verbesserung: "Mainscreen 1" Klick auf Spannungs-Anzeige öffnet Screen "USB" wenn verbunden, wenn nicht verbunden öffnet Klick Screen "Batterie" - graphische Balken-Anzeige für Batterie_Level jetzt auch mit "Akku leer"-Warnung und Klick öffnet Screen "USB" wenn verbunden, wenn nicht verbunden öffnet Klick Screen "Batterie", Screen "Menu 1" Eintrag "Profile / Coil" getrennt, Screen "Coil" komplett überarbeitet, Screen "Info Temp/Ohm" Eintrag "Board-Temperatur" hinzugefügt, Screen "Über" Eintrag "mWh seit Reset" hinzugefügt 2.1.2 Verbesserung: Feste Auswahl des Mainscreens möglich (Mainscreen 1 oder Mainscreen 2 "Bad Eyes") ist jetzt möglich. Abhängig von der Auswahl des Schalters "Mainscreen" im Screen "Anzeige" schaltet nun das unter rechte Symbol in allen Screens entweder zurück auf Mainscreen 1 oder Mainscreen 2("Bad Eyes"). Bedingt durch die Limitation der Software wird nach dem Unlock des Gerätes immer das Mainscreen 1 angezeigt, auch wenn Mainscreen 2 ("Bad Eyes") als Mainscreen aktiviert ist. In diesem Fall kann aber das Mainscreen 2 ("Bad Eyes") durch einfaches Anklicken des unteren rechten Symbols wieder aufgerufen werden. 2.1.3 Fehlerbeseitigung: In Screen "Ent-/Sperren" funktioniert nun die Einstellmöglichkeit für "Auto-Lock" Verzögerungszeit, kleine weitere Fehler beseitigt. Verbesserung: Screen "Neuer Coil" optimiert, in Screen "Anzeige" zeigen die Textfelder nun den Status der dortigen Schalter-Stellungen an, in beiden Mainscreens die graphische Balken-Anzeige für Replay-Wärme verschönert. -> Und nun scheint der Augenblick gekommen zu sein, an dem mir keine weitere mögliche Verbesserungen für dieses Theme einfallen (und der Speicher des DNA ist mit dieser Theme-Version nahezu erschöpft - 99.2%) - aber ich überlege nun, ein neues Theme mit weniger Informationen und mehr künstlerischen Elementen zu entwickeln. P.S. In diesen Theme stecken Monate an Arbeit. Daher würde ich mich über eine kleine Spende von denjenigen sehr freuen, die dieses Theme so toll finden, dass sie es gerne verwenden. Vielen Dank Meine PayPal-Mail-Adresse ist: eBoy@lake-of-konstanz.de Verfügbare Versionen(jeweils Deutsch und Englisch): - Mr. Theo Bottomfeeder Black - Full Color - alle Textausgaben farbig (sehr buntes Theme) - Mr. Theo Bottomfeeder Black - Easy Colors - Beide Mainwindows farbige Textfelder, andere Screens Textfelder in gelber und weisser Farbe - Mr. Theo Bottomfeeder Black - Nearly Black and White - Beide Mainwindows farbige Textfelder, andere Screens Textfelder in weisser Farbe - Mr. Theo Bottomfeeder Black - Pure Black and White - Beide Mainwindows und andere Screens Textfelder in weisser Farbe Example for Lockscreen, Mainscreen1 and Mainscreen2 "Bad Eyes" Beispiel für Lockscreen, Mainscreen1 und Mainscreen2 "Bad Eyes" Aktual versions: Aktuelle Versionen: Mr. Theo Bottomfeeder Black - Pure Black and White - V2.1.3 German for DNA 75C DNA 250C.ecigtheme Mr. Theo Bottomfeeder Black - Nearly Black and White - V2.1.3 German for DNA 75C DNA 250C.ecigtheme Mr. Theo Bottomfeeder Black - Easy Colors - V2.1.3 German for DNA 75C DNA 250C.ecigtheme Mr. Theo Bottomfeeder Black - Full Color - V2.1.3 German for DNA 75C DNA 250C.ecigtheme Mr. Theo Bottomfeeder Black - Nearly Black and White - V2.1.3 English for DNA 75C DNA 250C.ecigtheme Mr. Theo Bottomfeeder Black - Pure Black and White - V2.1.3 English for DNA 75C DNA 250C.ecigtheme Mr. Theo Bottomfeeder Black - Easy Colors - V2.1.3 English for DNA 75C DNA 250C.ecigtheme Mr. Theo Bottomfeeder Black - Full Color - V2.1.3 English for DNA 75C DNA 250C.ecigtheme -
Theme : "Mr. Theo Bottomfeeder" V 1.8.9 - English and German GUI-Languages availiable - History: 1.7.0 Version without Replay-Mode for older firmware-Devices 1.8.0 Implemented Replay-Mode (DNA 75C and DNA 250C) 1.8.1 Implemented in Battery-Screen Power-Bank function settings (only DNA 250C) 1.8.2 Moved Power-Bank function settings into USB-Screen now (only DNA 250C) 1.8.3 Implement in Battery-Screen displaying different Voltages from up to 4 Batterys in the device 1.8.4 Voltage fields repaired - will be displayed correct now, if >10V. 1.8.5 Now voltages on DNA75C-devices with 2 Decimal Places, on DNA250C-devices with 1 Decimal Place 1.8.6 Bugfixes and switchable Outputs "Voltage or Ampere" and "Wattage or Ohms) for Mainscreen (chooseable in "Menu 1" - "Display") 1.8.7 Splitted switches for "Volt or Watt" and "Ampere or Ohm" and "Puff Duration or Puff Count" in Mainscreen (chooseable in "Menu 1" - "Display") 1.8.8 Minor Bugfixes 1.8.9 Pre-Head-Symbol integrated New Changes: Symbols: Mainscreen Right side up: "Flame" (clicking opens Menu "Info-Power") is displayed, if Pre-Head is activated "P" Is displayed, if choosen Punch-Mode Hidden, if no Pre-Head is activated Right side down: Coil-Icon (clicking opens Menu "TempControl-Prehead") - Blue coil with both pins down, if Boost deactivated and no Tempsense-Material and no Temp Sence Detect (usual Watt-mode) - Blue coil with right pin up, if Boost activated and no Tempsense-Material and no Temp Sense detect (usual Watt-mode with Boost) - White coil with both pins down, if Temp Protect deactivated and Tempmaterial but no Tenpsense detected (mostly Temp Sensing wire - but wrong TC-wire used in profile) If Pre-Head is activated, this results in activating the Punch-Mode with using the Pre-Head-Punch-Level instead using the Pre-Head-Temperature - White coil right pin up, if Temp Protect activated and Tempmaterial but no Tempsense detected (mostly Temp Protect with Temp Sensing wire - but wrong TC-wire used in the profile). If Pre-Head is activated, this results in deactivating the Temp Protect and activating the Punch-Mode with using the Pre-Head-Punch-Level instead using the Pre-Head-Temperature - Red coil both pins down, if Tempmaterial and Tempsense detect but no TempProtect activated (TC-wire with not activated Temp Protect) - Red coil right pin up, if Tempmaterial and Tempsense detected and Temp Protect activated (full working Temp Sensing Mode, TC-wire with activated Temp Protect) Replay-Symbols (like Tape-Machine-Buttons - No Replay/Replay On, Prepared Replay, Record Puff/Replay On): Play a recorded puff in Replay (always repeated): As soon, as a puff is recorded, the Replay-Symbol changes into a red Triangle "Play"-Symbol (also like the "Play"-Button on a Tape-Machine). Additionally the word "Playing" is displayed in big yellow chars on both Main-Screens of the Theme. That shows, the previous recorded puff will be repeated endless now. Mr. Theo Bottomfeeder Black V1.8.9 English for DNA 75C.ecigtheme Mr. Theo Bottomfeeder Black V1.8.9 German for DNA 75C.ecigtheme
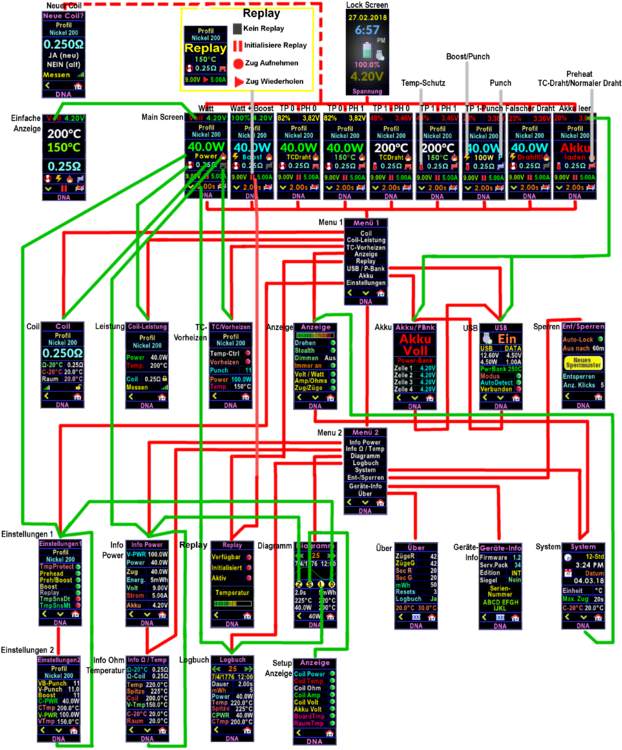

-
Theme : "Mr. Theo Bottomfeeder" V 1.8.5 The incorrect message on display after connecting USB "Pack full" is because the DNA needs some seconds for initializing. I detect "Pack full" with "connected = true" and "charging = false". Until the DNA has not finished it's measurement of the batterys, this conditions are same as if Pack is fully loaded. Sorry, found no solution to make this better. But after 5secs the display shows correct values. Greetings History: 1.7.0 Version without Replay-Mode for older firmware-Devices 1.8.0 Implemented Replay-Mode (DNA 75C and DNA 250C) 1.8.1 Implemented in Battery-Screen Power-Bank function settings (only DNA 250C) 1.8.2 Moved Power-Bank function settings into USB-Screen now (only DNA 250C) 1.8.3 Implement in Battery-Screen displaying different Voltages from up to 4 Batterys in the device 1.8.4 Voltage fields repaired - will be displayed correct now, if >10V. 1.8.5 Now voltages on DNA75C-devices with 2 Decimal Places, on DNA250C-devices with 1 Decimal Place This Theme-Version was created at 05/26/2018 by: Author: Hubert Allgäuer (Alias "Mr. Bottomfeeder"), Lake of Constance, Germany with using the program: "EScribe Suite V 2.0 with Service Pack 15.1" Information about using this theme: For using the Theme "Mr. Theo Bottomfeeder >= V 1.8.0" and the new Replay-Mode, you need the following Firmware on your Device. Otherwise this Theme can not be installed. Needed Firmware on the device: "1.1 SP 33.2 INT" or later version You can download Theme "Mr. Theo Bottomfeeder V.1.7.0" if you don't have a actual firmware on your device. That Theme don't has a integrated Replay-Mode and works with older Firmwares. Mainscreen: Upper side: Percent-Value (clicking opens Menu "Bad Eyes") Upper right side: Voltage-Value (clicking opens USB-Screen, if connected, otherwise shows Battery-Screen) Symbols: Left side up: Lightning (clicking opens Menu "Settings 1") Is displayed, if choosen Boost or Punch, hidden if Temp-Mode or working TempSensing-Wire Left side down: Temperature-Icon (clicking opens Menu "Coil-Power") Shows activated if actual profile is temp-protected Shows deactivated, if no activated Temp Protect or coil with no Temp Sensing Material or coil with Temp Sensing Material but no Temp Sensing detected (wrong coil-wire for choosen Profile) Right side up: "P" (clicking opens Menu "Info-Power") Is displayed, if choosen Punch-Mode, hidden, if working Tempsense-Wire Right side down: Coil-Icon (clicking opens Menu "TempControl-Prehead") Blue coil with both pins down, if Boost deactivated and no Tempsense-Material and no Temp Sence Detect (usual Watt-mode) Blue coil with right pin up, if Boost activated and no Tempsense-Material and no Temp Sense detect (usual Watt-mode with Boost) White coil with both pins down, if Temp Protect deactivated and Tempmaterial but no Tenpsense detected (mostly Temp Protect with Temp Sensing wire - but wrong TC-wire used) White coil right pin up, if Temp Protect activated and Tempmaterial but no Tempsense detected (mostly no Temp Protect with Temp Sensing wire - but wrong TC-wire used) Red coil both pins down, if Tempmaterial and Tempsense detect but no TempProtect activated (TC-wire with not activated Temp Protect) Red coil right pin up, if Tempmaterial and Tempsense detected and Temp Protect activated (full working Temp Sensing Mode, TC-wire with activated Temp Protect) Replay-Symbols (like Tape-Machine-Buttons - No Replay/Replay On, Prepared Replay, Record Puff/Replay On): Origin DNA-Datasheet: 'Replay is intended to capture the flavor and satisfaction of the “perfect puff” and provide the same level of performance and consistency on all subsequent puffs. The use of Nickel, Stainless, Titanium, or other material that increases in resistance when heated is required. In addition, Replay will also prevent dry hits when used with wattage control. To use Replay set the device to the desired power level and operate it normally. Once a satisfying puff is achieved, activate the feature to save and replay the saved puff each time the device is fired. Puff length is not a factor and the user will not be limited to the length of the previous puff. Disable Replay to resume normal operation or find a new puff to save. If Replay cannot be enabled the coil is not compatible. ' (Source: https://downloads.evolvapor.com/dna75color.pdf) Activating Replay-Mode: The Replay-Mode is changeable seperately for each profile. It can be activated directly in this theme, if choosing in the "Replay"-Page ("Menu 1" - "Replay"). Also the activation of the Replay-Mode can be done in the Profile-Settings in the EScribe-Program and uploading the changed Profile-Settings onto your device then. If the Replay-Mode is activated, the standard grey Replay-Symbol on both Main-Pages of this theme is changing into a "Halt"-Symbol (two red standing bars - similar the "Halt"-Button on a tape-machine). Recording a puff for Replay: If the Replay-Mode is activated, you have to puff some times for initializing the Replay-Mode. As soon the Replay-Mode is prepared for recording a puff, the "Halt"-Symbol on Mainscreen changes into a red filled circle (like the "Record"-Button on a tape-machine). Now you can click the "Record"-Symbol after you had a puff that fully meets your expectations. Play a recorded puff in Replay (always repeated): As soon, as a puff is recorded, the Replay-Symbol changes into a red Triangle "Play"-Symbol (also like the "Play"-Button on a Tape-Machine). Additionally the word "Repeat" is displayed in big yellow chars on both Main-Screens of the Theme. That shows, the previous recorded puff will be repeated endless now. Stop Replay-Mode: For ending the Replay-loop, just click onto the red "Play"-Symbol. The yellow "Replay"-Name dissappears from the Main-Screens and the Replay-Symbol changes back into the red filled Circle "Record"-Symbol. The Device went back into normal using-mode now. By clicking the "Record"-Symbol again, the last puff will be saved and the Replay-Mode changes into the Play-Mode. BE AWARE! Don't activate the checkbox "Puff saved, playing" in the Profile-Setings of your EScribe-Program. Just activate the checkboxes "Use replay on this profile". If activating the checkboxes "Puff saved, playing" at this point, the Replay mode would be activated - but without a recorded favourite puff. Mr. Theo Bottomfeeder Black V1.8.5 English for DNA 75C.ecigtheme Mr. Theo Bottomfeeder Black V1.8.5 German for DNA 75C.ecigtheme
-
Slowly reach the final version... History: 1.7.0 Version without Replay-Mode for older firmware-Devices 1.8.0 Implemented Replay-Mode (DNA 75C and DNA 250C) 1.8.1 Implemented in Battery-Screen Power-Bank function settings (only DNA 250C) 1.8.2 Moved Power-Bank function settings into USB-Screen now (only DNA 250C) 1.8.3 Implement in Battery-Screen displaying different Voltages from up to 4 Batterys in the device Hope, all works as expected. Couldn't test functions, a DNA 250C is needed for. Would be glad, if someone could test the DNA 250C features in this Theme and give me a response. Greetings Mr. Theo Bottomfeeder Black V1.8.3 German for DNA 75C.ecigtheme Mr. Theo Bottomfeeder Black V1.8.3 English for DNA 75C.ecigtheme
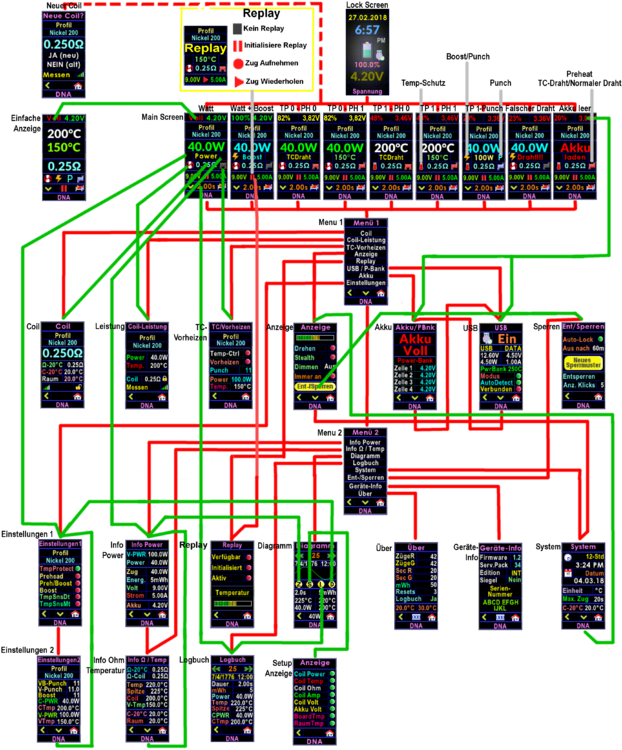
-
Hello friends, does anyone have a mod with DNA 250C and can test my theme 1.8.2? Now I have integrated additional the Power Bank feature, but I can not test it because I only own devices with DNA 75C. It would be nice if someone here could let me know if the power bank function works as I imagine. You'll find the settings for the Power Bank feature in "Menu 1" - "Pack / PBank" (see picture) Best regards Mr. Theo Bottomfeeder Black V1.8.2 German for DNA 75C.ecigtheme Mr. Theo Bottomfeeder Black V1.8.2 English for DNA 75C.ecigtheme


