

xevape
-
Posts
95 -
Joined
-
Last visited
Content Type
Profiles
Forums
Downloads
Everything posted by xevape
-
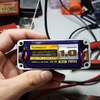
Here is a 1590B with 2200mAh LiPo. https://instagram.com/p/5-NgPvgWLE https://instagram.com/p/5-uWE-gWG2 https://instagram.com/p/5-y0RPgWNl Video @ 200W https://instagram.com/p/5-yiYGgWNQ
-
I can see that point. Most of my work with lipos have been where you could get at them for a quick disconnect. Not so here, but the charge and discharge rates are trivial (compared to RC use for the same packs) so I am not that concerned. In the event of a catastrophic issue, a software derived off might not be all that accessible.[/QUOTE] There shouldn't be any catastrophic failures like in the RC world since we don't overcharge or discharge at high continuous amps. If something bad does happens, the mod is going out the window. [/QUOTE] Fact of the matter is it should take too much effort to build in an "off" switch. My buddy vapes in the office and we have removable floor tiles since we basically work in the server room area. We have suction cups to remove the floor tiles. I figure in a disaster situation we remove a floor tile drop it under the floor, close the floor tile then go get some coffee....we have no windows...unless you want to look at production workers.
-
Not at all!! I think all suggestions deserve consideration.[/QUOTE] I always put the option out there since its the internet.
-
I second this. @XEVape
-
I did not run a test as such. I am not worried about voltage drop when idle. I just figured it would be a good idea to have an option for OFF, always. Lets say for instance you required to turn it off for lets say TSA or something our of the ordinary. You would need to wait an hr for the device to go completely off until you can pass through? I'm just saying why not if the option for it is so easy to implement. Also the "on feature" would be the "off feature unchecked" Basically the way the device is currently. Another situation is lets say FAILURE. If the mod is buzzing or something BAD is going on with it where you wish to god you can just turn it off....the option is not there at the moment. Please flame me if I'm acting out of sorts I just thought it would be a good idea.
-
So an option in the software to change that time should be simple, no?
-
I see you have a external button configured. If you put the chip in an auto fire scenario and the chip is autofiring and you clip your external switch does the device stop autofiring? If so the switch you are using is the cause.
-
What is the "period of time" you refer to as far as powering completely off. I do notice that it has a sleep function after "xx" seconds however there is no portion of the software or manual that states the exact time it takes to completely power off where as no energy is being used. If this function is too involved to implement then perhaps another value in the software that is located under the sleep timer for power off duration in minutes. My ideal situation is this below, not using preheat. Idle 10 sec Sleep 20 Off 2 min Currently there is no option for "Off" functionality. Thank you for allowing us to voice our ideas on this forum. I think with the community doing so this device firmware/software features are limitless. @XEVape
-
Could we implement an option/feature where as if you press the fire buttons 5 times and the device locks you can then hold down the fire button while locked and the device turns off completely. Basically "if locked" + "fire.held.for.5.sec" then "command for off" @XEVape
-
I know the guy who runs www.xevape.com =P
-
I would just check it. Then again "I void warranties"
-
I have a front facing enclosure that fits tactile buttons is this what you would want?
-
I think this would be my area... Instagram.com/xevape Take a look...
-
https://instagram.com/p/53PFoegWMc/
-
/topic/67577-topic/
-
I get a few free right, ya know for the idea... ;-)[/QUOTE] of course [/QUOTE] You should add a little + and - under the buttons
-
I get a few free right, ya know for the idea... ;-)
-
Trial and error my friend. Great thing about these is they are SUPER easy to break down and rebuild. The switches hold the dna200 in place, then a layer of heat shrink then the battery.
-
Looks damn good a lot of compact power. The only thing I see wrong is the Usb port is sticking up out of the case. Other than that I love it.[/QUOTE] Working out the USB Port issue on #3. I'm going to not cut the legs of the tact switchs so short as to raise them ever so slightly allowing the USB to rest even.
-
#2 in a 1590A Video https://instagram.com/p/50iEj3AWIS/?taken-by=xevape

-
Screws: http://www.mcmaster.com/#thread-forming-screws/=ya8xst Screen: Double sided foam tape, to press it snugly against the inside front. That's what worked for my plastic... John Wick[/QUOTE] Pan Head Phillips Screw for Sheet Metal, 18-8 Stainless Steel, Number 0 Size, 3/16" Length, packs of 50in the morning$6.74 pack Ordered & thanks
-
For the 3D printed where did you get the screws needed to attach the DNA to the 3D Printed posts? I can't for the life of me figure out where to get the screws. I do have one of these cases. Also what did you use to raise the LED Display and keep it flush? thank you
-
I'm in Nanuet NY and work in Rockleigh NJ
-
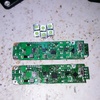
Removing the DNA 200 Buttons and replacing with Tactiles
xevape replied to xevape's topic in Installation and Assembly
I would like to add that the DNA200 pcb mounted buttons are wrapped and flowed under the actual button to a pad. If you try to do this with a radioshack iron you are going to lift the pads and have some issues. In other words, dont try this at home. I used TWO JBC CD-1BD Solder Irons at 720F with identical tips to touch all four pins on the pcb mounted switches and then carefully lifted them once the solder melted. My wife is hard to pursway in regards to buying the JBC Reflow station I wanted to use. John, check out the final product in a 1590A with 1000mah 60C Battery. https://instagram.com/p/5xDeB4AWCs/?taken-by=xevape -
The clicks makes me feel more manly. I also took apart the original buttons and retrofitted the tact buttons to make them non audible clicks but that's a whole nother' story.[/QUOTE] Ya it looks like you kinda took the bottom of the original button and put the top of the KSJ buttons on.[/QUOTE] Nope these are soldered directly to the pcb https://instagram.com/p/5xDeB4AWCs/?taken-by=xevape


