

valld
-
Posts
28 -
Joined
-
Last visited
Never
Content Type
Profiles
Forums
Downloads
Everything posted by valld
-
Great Mods! Is it possible to use LiFePo batteries with DNA75? I did some research but couldn't find info if battery with DNA75 is programmable like the DNA200 with e-scribe.
-
Me too. The fire button was touching the screen ribbon cable when pressed. Check here in the forum, there is a good instructions how to move the cable away from the button. Second you find the discharge CSV for your batteries and set your battery pack in e-scribe.
-
Well, it looks like Evolve are not interested in further developing and investing in DNA200 chip. With the speed they react to our requests DNA200 will be obsolete very soon if it is not already..... Just get RX200 and forget it...............
-
Did you set properly your battery in EScribe? What EScribe device monitor is showing in battery related fields? Screenshots from both screens would help resolving your problem.
-
Resistance still climbs while it's supposed to be locked?
valld replied to p8ntballa9362's topic in DNA 200 and 250
I don't think DNA 200 is designed to handle properly Ti, Ni and SS wires in Power mode (Temp control turned off). It will be best if Evolve crew chip in here and explain what happens if you try to do this, and if it's at all possible or not. -
I agree 100%. I'm somehow happy that I did open my other feature request thread, about the not very convenient way of changing the temperature from the device, few days before Busardo's review. It looks like many people want this changes, me including. Anyway, the board is great and just needs some menu/controls improvements to become perfect. I just wish they will be done quickly, because this technology (as he said in the review) is moving with 250 miles per hour, and Evolv must be quick with all software and menu 'refinements', if they don't want to end up with a great but obsolete board. Chinese manufacturers are catching up quickly with interesting (and very cheap) solutions and the DNA 200 might just be forgotten if there are reasonable alternatives at 1/5 of it's price....
-
Guys, I just watched PBusardo's review (part 1) of the DNA 200 and decided to open a new thread to discuss it. https://www.youtube.com/watch?v=6KQGxsYfG9U
-
Thanks Nick, for appreciating our suggestions. I can imagine how many new ideas/ requests you guys have to assess and put on the scale. People are different and have different approaches to the same issues, especially in the vaping world and the not yet settled Temperature Control/ Temperature Limiting related ones. You made a great product, but you also put a big weight on your shoulders with giving us the options to customize and tinker options, screens and features. Because we are getting spoiled and we will always want more
-
John and the team are quiet, I believe they are not finding this issue important. At least to tell is if they will look at it, does it make sense to them and is there any possibility this change to be done.
-
Feature request:- default field 4: option
valld replied to lewisss's topic in EScribe, Software and Firmware
+1 from me, a must have feature -
IllinoisPlumber, this is not right and it's not normal. The resistance can change a bit (0.01-0.02 Ohm) with tight connections and solid build, after some days, but no way to have such big difference. Something is wrong with your connections somewhere, check your 510 connector on the mod and your atomizer, coil, mounting posts, 510 pin, every possible contact. Also checking your build in Steam Engine, the correct resistance looks to be the .28, so probably you had a short somewhere in the coils and it was showing way lower resistance. Always use the steam engine calculator when building new coils, especially dual coils, and check if the resistance of your new coil matches the calculator result, before wicking and firing.
-
That's all I need as well. Sorry Lewisss, I didn't read your thread before posting the request, it is basically the same :-)
-
As I see no one is against (it's OK to be optional, not necessary default setting), maybe Evolve crew can chip in and comment.
-
I'm now very confused. The two months that I'm using temperature control devices I never even thought about using them in that way. My understanding is that you find your perfect temperature for the given coil and juice combination, up the wattage where it will be always enough, above the average power that you will be using and let the magic of TC do the job keeping your temperature at the sweet spot for an even and constant vapour. And I had a great success with this. Some TC devices (Istick 40w TC) does not even let you change the watts in TC mode, only the temperature, and this is working without any issues. Your way suggests that you are using the TC only to prevent the coil from overheating if something goes wrong and your wick gets dry or you run out of liquid, and in this case you have to always balance between the temperature and power to match your coil. I'm just not getting it. Why do it this way?
-
Maybe I wasn't very clear, I'm not speaking about change of functionality, just how the board displays and controls the temperature with TC turned on. Now we can change the watts and temperature, just the temperature change is buried deep and not easily accessible, while the watts are easy to change, which is perfectly fine in TC turn off mode, but when in TC on I would prefer to bury the Watts than the temperature......
-
As JaySoCal suggested above, you can just ask for three eyeglasses screws in the nearest optics shop, thats what I did.
-
I'm happily using my DNA 200 homemade mod for about a month now, but there is something that bothers me a lot. I did search in the forum and didn't find any discussion about this, please correct me and even delete my thread if was already discussed. When I'm vaping a build with a normal kanthal coil with TC switched off, the current default screen is perfect - I can change the wattage in a few clicks, I can lock it with holding the up - down buttons pressed easily and I have a quick and easy way of controlling my vape. All is good there. Until I switch the TC on. With temperature control switched on, changing of Watts often is becoming useless. If your Ni/Ti build is good you can safely set the Watts to 200 and forget about it. What is important here is the temperature and I find myself changing the temperature quite more often in TC, especially after a new build, until it settles down. And here I have a problem, I have to 5 click the power button, double click the up/down buttons to enable temperature change, then another 5 clicks to unlock the power and start vaping. Definitely not as easy as the Watts change, and can be annoying if you play a lot with your new DNA 200. My request/suggestion is just to swap the display and controls of the Temperature and Watts accordingly when changing the TC on and off. Double click and hold the up/down buttons when TC is on to lock the temperature and not the watts, and the screen to show the temperature as a main parameter, and not the watts. I have no problem changing the watts in TC with 5 clicks on the power button, then holding the up/down pressed, change the watts, another 5 clicks on the power button, because I simply don't change watts in TC. But it will be so much better, if I can just change the temperature in TC the way I now change the watts. I'm sorry for the too many words used for something so simple, English is not my first language, I hope I did not bore you to dead with this post, and I hope my suggestion makes sense. O, forgot to say that DNA 200 is a great board and I enjoy every minute using it
-
Check your PC specifications, it should include the maximum current the USB 3 port can provide.
-
Great, I like that quick problem solving! Guess we are now ready for 2 cell configuration!
-
Yep, exactly as John explained in the first post.
-
Rick, I think that everything's fine with your wiring, let the gurus chip in and confirm. John, can you please check this last 10 posts and advice what could be Rick's problem?
-
Did you set your battery configuration to 2 cell? You are not supposed to see a third cell 'cos it's not there.
-
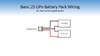
This should help I guess. From bottom to top on the diagram: the '+' wire will go from the battery holder '+' to pin no 2/3 on the board, the middle wire will go from the battery holder bridge to pin 1 on the board, and the last cable will connect the battery holder '-' to ground tap connection on the board. Please correct me if I'm wrong.
-
+1 A simple diagram will help all of us with dual 18650 configuration. John already mentioned that we need to bridge tap connections 2 and 3, but how exactly the 3 wires from the tap are connected to the battery sled?
-
ModMakerBox 846024 - will it fit DNA200?
valld replied to valld's topic in Installation and Assembly
Thanks JoJo, 84mm, same like mine, that's exactly what I needed... Good luck with finishing your project, be carefull at the final steps?
