

John la
-
Posts
71 -
Joined
-
Last visited
-
Days Won
3
Content Type
Profiles
Forums
Downloads
Everything posted by John la
-
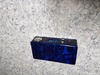
Here it is...... so much prettier in person
-
Dna 200 build. led switch. now finished with pics
John la replied to John la's topic in DNA 200 and 250
So here is the finished product I didn't not wire it up the same as pic number 2 (from my first post at the top and the first reply) I soldered off the connection so couldn't make it work like that. So I removed the resistor and installed it on the button and we'll you can see how I connected everything else in the pic. so far for the day I have been using it no problems lights up when I push the button. I think I'm in love. If you have any questions pm I'm on here at least once a week asking questions hahaha


-
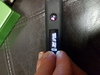
So I'm trying to get the led going and I soldered off the connection right next to the blue wire is there anything I can do or am I screwed chip still work BTW thanks guys

-
I have not finished this box yet think I'm going to go with a blue kandy maybe a red kandy green is really nice too. Thought I'd share this halfway done pic make someone a little jealous so pulled the board from a hcigar vt200 (fire button was going) put it in a g box with 16mm led switch, v2 varitube, and drilled out the + - and used the hcigar buttons, 1300 lipo led switch takes up alot of room maybe a mitech switch next time. Next once the box comes in will be a dna 250 in the gbox. Ps dna 75 in the p box is the other mod in the pic.

-
Dna 200 build. led switch. now finished with pics
John la replied to John la's topic in DNA 200 and 250
I've never solder anything like this before it was so small but here it is everything is holding tight and it's not touching the board. I see when you zoom in the one lead doesn't look right it's just some extra solder on the metal that came of the solder gun the connections are just like the pic above. I will let everyone know once I finish my mod in a couple days if the led work thanks.
-
Dna 200 build. led switch. now finished with pics
John la replied to John la's topic in DNA 200 and 250
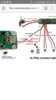
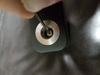
OK so I have read everything on this fourm and just want to make sure this is right. First pic is from the website I purchased my button from. 2nd pic is one from this fourm. 3rd pic is dna 200 chip with 100 omh resistor. 4th is the box with button. Now from what I have read I should wire it like the 2nd pic? And I feel like this resistor is big have not solder one before. Can it touch the board or should it be floating a bit? Thanks for the help guys


-
Anyone else know if I can cut the tabs on the power button to remove it?
-
I need to remove the power button off the chip to make room for a nut. Is this possible? Or will I damage the board
-
Nobody?
-
So I had a hcigar vt200 everything went at the same time the battery and the fire button. Had it set at 20x lock and it would lock mid puff. It had 160 000 pushes on it so I'm guessing that's normal for this type of button. So I pulled the chip and bought a g box with a mitech button. My question is by wiring a mitech button to the board will this fix my 20x lock issue
-
So just an update on my vt200 with turnigy 1300 battery. Loved this thing the battery lasted me a day or died an hour before bed but now it's dead forever. The battery swelled up on me feels like there's air in the cells and the fit was so tight that I could see my vt200 body expanding so I opened it up had trouble just pulling the battery out. Because I grinder down the sides on the inside of the vt200(at the body seams of the vt200) it had maybe like 1ml of liquid on the inside all over the battery and the body the board was the only dry part so that's good since I'm gona pull the board and put it in a new box. Don't know what caused the battery to swell at the three month mark the liquid in the case or maybe even overcharging. I had a 0.5 load when doing the battery test u think cam out to 14.23 so I don't know and I did leave this on the charger over night for 3 months but after doing this I don't think I would recommend this to anyone
-
Ya I fixed the screen lifted the tape moved it over and then cut the extra off but the 510 not screwing down is kinda of just annoying and I know it can look better not sure if I should force something on there yet but for the price and it being a dna this device is great. I do like the way the presets were done
-
Ha never seen those before
-
Ya the 510 center pin when pushed in looks like it sits flush with the black part. I screwed in an atty so tight that I had to use vice grips to get it off (old kayfun). Maybe just tighten it down with the vice grips or bad idea? Oooo and I took it apart already day 2 and fixed the screen that sticky tape is crazy strong but now it's perfect.
-
So just bought the sdna75 by smy and it's not great. None of my attys (5) screw down flush and it looks like it should but won't. I have tried forcing it thinking that maybe it's just the threads and have cleaned the 510 threads and it did nothing. My screen is off not a big deal but not pretty to look at. I'm sure I can take it apart and center it better but who wants to void there warranties and wait even longer for it. Any help would be nice with the 510 I have the bellus the griffin 22mm the g24 rda the azeroth and the crius and none go flush thanks guys

-
dont do it im not positive but STvapes sent his 200 in over the coating coming off and they gave him a new one so i would contact vaporshark and see what they say
-
Thanks dwcraig1 I thought it was going to be ghetto but it turned out really nice just filled in the hole with a small amount of silver solder and it connects like it should rotated the battery around while device is on and no problems thanks man now I can finish this build
-
I do have silver solder it's what I used for all the connections didn't know how hard it was to de solder it but I can pull out a negative contact on the sled I'm sure I could do it on the sled though I'd prefer not to do that but what else can I do......
-
Hey team so I resoldered the board changing the negative to the top and positive to the bottom thinking that would help don't know why because it still didn't work in the mod. piss off. So I slide a very thin peice of paper in between the connection to find out there was no connection and I could slide the paper in and out with ease. Any help would be greatly appreciated!!!!!! I see guys with these built on here but don't know how they did it


-
Thanks chunky button so I resolder the connections on the sled for slot 2. Plugged in a battery while the sled was out of the box and it worked so slide it in the box to try it again with one battery and it didn't work. So after wiggling the battery and pulling it in and out I noticed the battery was not making contact on the negative (a hairs length can barley see it with the flashlight) on slot 2 it rest on the side of the body where the magnet is and does look like it's making a full connection and I I angle the battery it turns on kinda don't know what to do now maybe it's a bad battery sled or the box was not cut out properly. I know I need to re wrap that battery it does not work with my other battery's too. Any ideas would be great


-
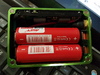
So I built my dna 75 box this weekend but am having troubles with the battery they don't discharge evenly. So I can plug one battery in (closest to the board battery slot) and it works. Now if I pug it in (furthest from the board battery slot) it does not turn on. So with using it today I had the 2 battery in the device and its saying 33% so I pulled the furthest from the board battery out and used it said 32% so then I put the other battery in the first slot by its self and it said 98%. Using it now till it gets down to 32% then going to charge externally. So I guess my question is do I need to resolder the connection on the farthest away from board battery slot ( slot 1 and 2 are one solid 16 gauge silicon wire connecting the two for positive and one solid wire for negative too) or is this a problem with my solder to the board? Thanks guys

-
What about a battery test for the dual 18650s? I found it and just started running it
-
First ever build guys never soldered before turned out great. Was not cheap when you have to buy tools hahaha. Link to most parts http://stores.ebay.com/shopatistore/


-
So I just finished my dna 75 build had a couple puffs on it and decided to connect to escribe I have tried a couple different escribe softwares and can not find the manufacturer settings. I do not know how to set up the chip for dual 18650 or if I even have to any help would be nice

-
Yaaaa it fired up well not yet but it's on I just took out the batteries and put them back in hit the button and worked second time around thanks guys


