Nykademos
-
Posts
32 -
Joined
-
Last visited
Never
Content Type
Profiles
Forums
Downloads
Everything posted by Nykademos
-
copper1590g(1300mah), 2x "XL"1550p+ copper+brass (1300Mah), "ebay"1550p+ (1000mah), colectors edition releaux- fake copper colored zinc, still pretty, heres a simple theme to go with classy mods, DobkinTheme250.ecigtheme new coil y: 100, 19. n:100, 4
-
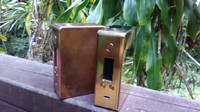
These new brass and copper dna kits from Dripp3d are the easiest and the prettiest pre-cut boxes on the market. 29.7mm wide P+ style box. I also made a purple anodized aluminium one for a friend but the color bled like crazy and the 510 on their aluminum box isn't centered, the copper and brass are. Also, while the screen is centered, the buttons are just a hair off center, barely noticeable, but if this triggers your OCD, like me, you can't un-see it. Anyway, still the best looking thing I've seen for a glu-n-go DIY. about $20-30 bucks more than an Alpinetech kit. it can take a big atty, I put a 1300mah nano-tech, fits perfect with xt30 connector and a board mounted jst. I really wish these companies would stop using these 3d printed mounts and just make the box with #0-80 holes for proper standoffs, maintenence on a glued box is a pain in the ass, and glue sucks. At least make the 3d one a 3 piece mount so the center portion with the screen doesnt get glued in too and can be removed with the rest of the board without removing the mount. If i make another one, I am cutting the mount in thirds, or drilling holes for standoffs- which can go horribly wrong. I do like the all flat, easy to polish, minimalist design that the screw-less look offers. Edit- I am 99% sure that the 2000mah maxamps can fit in here with a very well planned wriring job. Very tight fit, but looks like its possible.

-
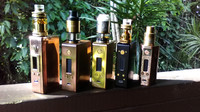
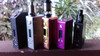
I have eyed my moonshot box 100 times thinking of this, but with a maxamps 1800. Very nice sir! Here are some of my babies,


-
This is the fourth mod I built and I like it the least. Alpine G+ precut DNA200 type 2 box. The button hole was set too close to the corner so I had to file the nut down on one side, the board mount is described as able to remove chip if needed, but thats not true because the screws will just spin and since its designed to be glued in your not getting it out, plus the screen is not coming out and the space is far too small to re mount the ribbon. their boxes are made for grub screws, but they sell you magnets that dont fit. I contacted these guys three times before the listing came up on ebay, i was pretty much ignored then my order came and it was missing 3/4 of my items, when I let them know I was missing items they just sent a new shipping number... not a word otherwise. So after about 2 weeks I finally got all my things I dont know if they are too busy or what but I am going to avoid doing business with them in the future. This is a venom 1300 35c btw, it fits perfect in this with a velcro strip on bottom to secure the battery, but it fits in a standard 1590g as is it were made for it. been using this battery for about a month now and its shown no signs of puffing or flexing, still hard as the day I got it and I get a true 1300 mah. Luckily this box is sold already and I dont have to think about it anymore. Unfortunately I bought a gold box just like it but I am going to drill some board mount holes in the face so I can use some proper brass standoffs, these plastic board mounts just make everything feel kinda cheap, and I hate glue.
-
It was James Dean, but when i went to cf wrap and put better up/down buttons, i shorted the chip. I've decided that hard-wiring batteries is a no-no. I'm now using the venom 1300 35c (85*30*19.5mm) in this mod and in my copper 1590g, perfect fit for both and a better battery than those squishy turnigys, wrapped the battery to match the mod and have an extra sliding lid that you can change out.


-
Unfortunately, you predicted the future here... blew the fuse on the chip and the battery has light scorch damage on the wires. I tried to remove the components from the box to do some cosmetic work (bigger buttons carbon fiber wrap) and since i had to hard-wire the battery it was left prone to mishaps made worse by a stripped screw. So the box, battery and chip are beched. The FDV box was cool and I like design, I wish it had more rounded corners and edges though and the finish sucked, you need to do more to it. I do not recommend hard-wiring batteries, I am rebuilding James with a venom 1300 35c (85*30*19.5mm) this leaves room for plugs. Maxamps is a great battery, but two of these venoms would have been the same price for 2600mah with plugs. I am going to see if I can get maxamps to repair and test my battery, they seem to have excellent customer service, lets see how good. As far as my chip goes, I am not skilled enough to remove and replace the fuse. What should I do here? It's an 80 cent fuse. I would like to save my $80 chip.[/QUOTE] yu could always used bullet connectors to save space. They would have fit with that maxamps 1850, in the enclosure you had. [/QUOTE]there was only room for wires and it was still real tight. I was more meaning in regards to fixing my chip.
-
Unfortunately, you predicted the future here... blew the fuse on the chip and the battery has light scorch damage on the wires. I tried to remove the components from the box to do some cosmetic work (bigger buttons carbon fiber wrap) and since i had to hard-wire the battery it was left prone to mishaps made worse by a stripped screw. So the box, battery and chip are beched. The FDV box was cool and I like design, I wish it had more rounded corners and edges though and the finish sucked, you need to do more to it. I do not recommend hard-wiring batteries, I am rebuilding James with a venom 1300 35c (85*30*19.5mm) this leaves room for plugs. Maxamps is a great battery, but two of these venoms would have been the same price for 2600mah with plugs. I am going to see if I can get maxamps to repair and test my battery, they seem to have excellent customer service, lets see how good. As far as my chip goes, I am not skilled enough to remove and replace the fuse. What should I do here? It's an 80 cent fuse. I would like to save my $80 chip.
-
Wouldnt all this be easier if the battery meter display was based on voltage rather than Wh?
-
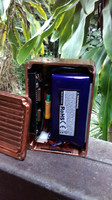
call me a hypocrite, I used this max-amps battery in a fdv "big-g" enclosure. The battery seems to get nearly double the time over the 1250 turnigys i have. Also the company sent a handwritten thank you note featuring their award(?) Who does that anymore? Pretty amazing service, the battery works great. Lifetime warranty... I wont ever use the amps this pack is capable of, but I vape 6-10 ml a day and this battery will go 3+ days without needing a charge. Just wish they used silicone wire on the balance plug too.
-
very tasty! great job! hows the fire button in relation to firing, holding it? obviously thumb fired but is it natural, comfortable? maybe this one wont veer off the road and crash?[/QUOTE]I love the mitecs, I finger fire but either is equally comfortable, the box itself is hard edged and i could see the corners wearing in some rebel-like marks in your jeans. I'm going to give it bigger, more shiny up-down buttons and a carbon fiber wrap. The finish that comes fro FDV is very easily scratched. I'm also putting on a regular v4 connector, no need for low pro here. I like Betty White better though, the copper box is so heavy and rounded edges are nice, plus the patina between polishes.... it always looks cool. James Dean is more my daily user, if he crashes and burns I will always have Betty White.
-
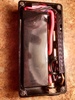
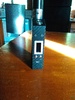
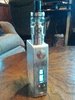
And this is James Dean. James is a FDV "Big G" enclosure...hadn't seen anybody use one of these yet. Sliding door with a spring-loaded lock on the bottom, no screws or magnets needed. Very liteweight. No glue or epoxy used on my project unless its superglue on a magnet.


-
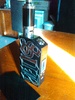
This is Betty White, Betty is solid copper 1590g from Dripp3d with brass bezel. Gold-steel 3d buttons from mamu, FDV v4 shorty low-pro copper, also brass standoffs and brass screws with brass nuts(wink), and a turnigy "1250(long)" Battery is changeable.


-
I have to ask a couple tough questions: 1. Do you actively call out manufacturers that falsify battery ratings? Because their battery is not 1300mah, doesn't this affect competition for other manufacturers that may be charging a little more for a true 1300mah device, also it works incorrectly with the battery meter if you set it wrong making your chip look faulty to a typical user. 2. Saw this on reddit and I hate to spread rumors but I would certainly feel better knowing that you are also concerned about issues like child labor, plus little kids can't solder for shit. Have you guys looked into this? https://www.reddit.com/r/electronic_cigarette/comments/20eixd/the_sad_truth_of_hcigar/ [/QUOTE]So... I guess my questions were too tough?
-
I have to ask a couple tough questions: 1. Do you actively call out manufacturers that falsify battery ratings? Because their battery is not 1300mah, doesn't this affect competition for other manufacturers that may be charging a little more for a true 1300mah device, also it works incorrectly with the battery meter if you set it wrong making your chip look faulty to a typical user. 2. Saw this on reddit and I hate to spread rumors but I would certainly feel better knowing that you are also concerned about issues like child labor, plus little kids can't solder for shit. Have you guys looked into this? https://www.reddit.com/r/electronic_cigarette/comments/20eixd/the_sad_truth_of_hcigar/
-
I know what your saying, its advertised as a 1300mah battery, but users have tested it with the escribe software and it is a 1000mah battery. Makes sense because it is 30% smaller than any other battery that is truly 1300mah. My turnigy 1250mah 30-60c is 20x30x90mm this thing is 20x30x68mm. Hcigar lies, are you surprised? I bet they are getting alot of purchasers that are making their decision on the inflated battery rating. also pbly not 30-60c as it is wired with 18guage power wires, only 25c and below are typically wired with 18guage. so 11.1Wh is the setting you want, they are making a small admission of their lie by setting it to 12.2 in the escribe. Your battery weak sign should kick in when the batt hits 0%, not 15%
-
I buy Mr Goodvape Creamscicle liquid from these guys regularly. They are the only place i can find that sells 30 ml bottles, cheap too. Be sure to set your Battery to 11.1Wh in the mod tab on your escribe. It is a 1000Mah battery (in case you have not been reading previous posts)
-
That battery is overkill, 1800mah is nice but you will never need 100c, which is the main reason thats a 70-80 dollar battery, Most batteries with 1800mah are $10-$20 and provide more amps than you can use. I can literally buy 9 of my turnigy for that much money.
-
What charger are you using, I bough a cheap one on ebay but my 1250mah takes 3 hours
-
it broke because its very thin soft wires, and the jst balance connector was not set direct to the board. this design is for battery replacement due to failure, probably poorly suited for daily swapping, where is the extra space for a bigger battery? I dont have one so I dont know. I have researched these batteries more than i like to admit (I kinda geek out on stuff) I'd be happy to help you guys find the battery that works. Alan, here is a link for a jst extension, if you open up the mod an can get to the board soldering that on to the board is easier than you think. that extension or any other should help grip things more gently than a yank.http://www.ebay.com/itm/261101316372?_trksid=p2060353.m2749.l2649&ssPageName=STRK%3AMEBIDX%3AIT
-
it broke because its very thin soft wires, and the jst balance connector was not set direct to the board. this design is for battery replacement due to failure, probably poorly suited for daily swapping, where is the extra space for a bigger battery? I dont have one so I dont know. I have researched these batteries more than i like to admit (I kinda geek out on stuff) I'd be happy to help you guys find the battery that works.
-
So they should have rated it 1000mah. Pretty funny that a manufacturer would choose to lie about it when you have the software to pull their skirt up. Evolv should reach out to the large manufacturers and tell them not to do that or it could harm the reputation of the chip. We all know how quick the mob can turn against you.
-
I may have the answer, I actually just bought this battery for a DIY in a milled 1590g (solid copper woohoo!) I made a 1590g+ with a "turnigy 1250mah (long)" from hobby king. It is a true 1250 30-60c and the dimensions are 90x30x20. since this copper box i got is a hair smaller than the g+ i thought the vt200 battery will fit good length wise as it is 68x30x20. I am aware the vt200 battery is only 1000mah and i would typically avoid buying a product that comes with lies, however, for my project its the battery that fits. so if length is there in the vt200 this turngy 1250 might work for you guys. Hobbyking really charges alot for shipping though, but its an $8 battery.

-
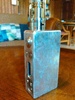
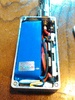
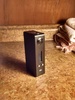
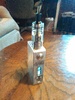
turnigy 1250 (long) in 1590g+ no glue. My first mod. made the lid slide and lock to the bottom of the box, it has a cool switchblade effect to open it. NYKADEMOS.ecigtheme


-

Anyone post a picture of a CNC 1590G beside the Snow Wolf 200
Nykademos replied to Rip's topic in DNA 200 and 250
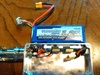
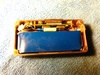
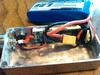
O.K. Here it is. 1590g+ I made some modifications to the box and lid to make everything fit without resizing any wires on the battery itself, the idea is an easily swappable battery, I have two. The guy on ebay that sells the 1590g with a sliding door wont ship to me in Hawaii, so I made the lid slide by removing some lip on the lid, also made notches so it locks on the bottom magnets (actually pretty slick, slide open with my thumb and it magically leaps down and relocks on to the lower magnets keeping the lid in perfect line and hoilding it for me while i show off my guts). I also had to carve out three corners. if you wire the jst plug away from the board this can all fit without any carving, the battery does fit without ant carving of the corners, it actually wedges in, for my intentions of an ez swap battery i chose to do a little dremmel work. this is my first mod, i've never built anything really. I make Hamburgers. That being said I am pretty proud of myself and am thinking if i got a dremmel press and router setup this would be really ez to make to a higher level of craftsmanship looks-wise. I did freehand the usb and window with a dremmel but I kinda dig the flintstone look. I coulda countersunk the chipmount screws a tiny bit deeper but all in all I am fuckin stoked. I could retouch some things on this but I am gonna leave it just the way it is as a reminder of my first mod. Oh, also note the magnet I had to recut for on the top corner, did that so the battery could slip under it. edit...no glue used, no button replacement.... I dissassembled the metal button switches and used the tops as actuators, I had purchased the mamu buttons from shapeways- metal takes like a month, but i lost one gring it but i like these and was happy i could use them WITHOUT REPLACING THE ORIGINAL WATERPROOF SWITCHES/ wich apparentltly the interwebs thinks cant be done for some reason, I used mamus mounting plate for the chipmount and her/his? template to cut out my holes. -
O.K. Here it is. I made some modifications to the box and lid to make everything fit without resizing any wires on the battery itself, the idea is an easily swappable battery, I have two. The guy on ebay that sells the 1590g with a sliding door wont ship to me in Hawaii, so I made the lid slide by removing some lip on the lid, also made notches so it locks on the bottom magnets (actually pretty slick, slide open with my thumb and it magically leaps down and relocks on to the lower magnets keeping the lid in perfect line and hoilding it for me while i show off my guts). I also had to carve out three corners. if you wire the jst plug away from the board this can all fit without any carving, the battery does fit without ant carving of the corners, it actually wedges in, for my intentions of an ez swap battery i chose to do a little dremmel work. this is my first mod, i've never built anything really. I make Hamburgers. That being said I am pretty proud of myself and am thinking if i got a dremmel press and router setup this would be really ez to make to a higher level of craftsmanship looks-wise. I did freehand the usb and window with a dremmel but I kinda dig the flintstone look. I coulda countersunk the chipmount screws a tiny bit deeper but all in all I am fuckin stoked. I could retouch some things on this but I am gonna leave it just the way it is as a reminder of my first mod. Oh, also note the magnet I had to recut for on the top corner, did that so the battery could slip under it. edit...no glue used, no button replacement.... I dissassembled the metal button switches and used the tops as actuators, I had purchased the mamu buttons from shapeways- metal takes like a month, but i lost one gring it but i like these and was happy i could use them WITHOUT REPLACING THE ORIGINAL WATERPROOF SWITCHES/ wich apparentltly the interwebs thinks cant be done for some reason, I used mamus mounting plate for the chipmount and her/his? template to cut out my holes.